ESP32 Arduino Tutorial HTTP Server:2. Template processing with multiple placeholders
In this tutorial we will check how to use multiple placeholders in the template processing engine of the HTTP async libraries for the Arduino core, running on the ESP32.
If you need an introduction on how the template processing works, please check this previous post.
The code fr this tutorial will be very simple and similar to what we have been covering before, with the exception that now we will handle more that one placeholder in the template processor function.
We will simulate a scenario where we would want to return a HTML web page with a temperature and humidity value that would only be known at runtime. For this test and to focus on the template processing features, we will generate some random values to simulate temperature and humidity measurements. You can check more about random number generation on the ESP32 in this previous post.
The tests were performed using a DFRobot’s ESP32 module integrated in a ESP32 development board.
If you prefer a video version of this tutorial, please check here:
The setup code
We start by including the libraries needed to connect the ESP32 to a WiFi network and to setup the HTTP server. Additionally, we will need the WiFi credentials of the network, so we can connect the ESP32 to it.
#include "WiFi.h"
#include "ESPAsyncWebServer.h"

const char* ssid = "yourNetworkName";
const char* password =  "yourNetworkPassword";
Next we will declare the string that will contain the HTML code with the placeholders. We will define a placeholder to be replaced with the simulated temperature value, and another for the humidity. Remember from the previous post that placeholders are enclosed in percentage signs “%”.
Note that we are declaring this HTML string as constant so it is placed in FLASH memory rather than in RAM. For bigger web pages, this allows to save a lot of RAM.
const char * html = "<p>Temperature: %PLACEHOLDER_TEMPERATURE% ºC</p><p>Humidity: %PLACEHOLDER_HUMIDITY% %</p>";
To finalize the global variables declaration, we will need an object of class AsyncWebServer, which will be used to configure the endpoints of the server. The constructor of this class receives as parameter the port where the server will be listening. We are going to use the default HTTP port, which is 80.
AsyncWebServer server(80);
Moving to the Setup function, we will start by opening a serial connection. This will be useful to output the IP assigned to the ESP32 once it connects to the WiFi network, so we can then reach the server it will be hosting. We will also connect the ESP32 to the WiFi network.
Serial.begin(115200);

WiFi.begin(ssid, password);

while (WiFi.status() != WL_CONNECTED) {
    delay(1000);
    Serial.println("Connecting to WiFi..");
}

Serial.println(WiFi.localIP());
Still in the Arduino Setup, we will now configure an endpoint where our server will be listening. It will be called “/sensor” and listen only to HTTP GET requests, since the client will only be requesting for the HTML page.
server.on("/sensor", HTTP_GET, [](AsyncWebServerRequest *request){
    // Route handling function
});
In the handling function, we will return the answer to the client using the send_P method of the request object that is passed to the handling function by the HTTP web server framework.
As first input of the send_P method we specify the HTTP status code, which will be 200 (success). The second argument corresponds to the content-type, and it will be “text/html”.
The third argument will be the HTML string which we defined as global variable and the fourth will be the template processor function. We will define this function below, but recall that it needs to follow this signature.
server.on("/sensor", HTTP_GET, [](AsyncWebServerRequest *request){
    request->send_P(200, "text/html", html, processor);
});
To finalize the Setup function, we need to call the begin method on our server object, so it starts listening to incoming HTTP requests.
server.begin();
The full setup function can be seen below.
void setup(){
  Serial.begin(115200);

  WiFi.begin(ssid, password);

  while (WiFi.status() != WL_CONNECTED) {
    delay(1000);
    Serial.println("Connecting to WiFi..");
  }

  Serial.println(WiFi.localIP());

  server.on("/sensor", HTTP_GET, [](AsyncWebServerRequest *request){
    request->send_P(200, "text/html", html, processor);
  });

  server.begin();
}
The template processor
As stated before, the template processor function needs to follow a pre-defined signature. It will receive the placeholder value as input (without the percentage signs enclosing it) and it should return a string, which corresponds to the value to be used instead of the placeholder.
Note that since we can only pass a processor function to the send_P method, it means that this function will be used for all the placeholders found. So, it will be called as many times as placeholders are found in the HTML string.
So, to confirm this is the actual behavior, the first thing we will do is printing the value received by the processor function.
Serial.println(var);
Since this function will be reused for the two placeholders, we need to implement here the conditional logic to decide which value to return for each placeholder. We can do it with some simple if else statements.
In both cases, since we are simulating measurements determined at runtime, we will return some random values.
if(var == "PLACEHOLDER_TEMPERATURE"){
    return String(random(10, 20));
}

else if(var == "PLACEHOLDER_HUMIDITY"){
    return String(random(0, 50));
}
To finalize, as a safeguard, we should return an empty string in case some placeholder that doesn’t match any of our conditions is passed to the template processor. Naturally, this should never happen if everything is correctly configured.
return String();
You can check the full function implementation below.
String processor(const String& var)
{

  Serial.println(var);

  if(var == "PLACEHOLDER_TEMPERATURE"){
    return String(random(10, 20));
  }

  else if(var == "PLACEHOLDER_HUMIDITY"){
    return String(random(0, 50));
  }

  return String();
}
The final code
You can see the final code below. Note that the main loop may be left empty since the async web server doesn’t need a periodic call to some function or method to process the clients’ requests.
#include "WiFi.h"
#include "ESPAsyncWebServer.h"

const char* ssid = "yourNetworkName";
const char* password =  "yourNetworkPass";

const char * html = "<p>Temperature: %PLACEHOLDER_TEMPERATURE% ºC</p><p>Humidity: %PLACEHOLDER_HUMIDITY% %</p>";

AsyncWebServer server(80);

String processor(const String& var)
{

  Serial.println(var);

  if(var == "PLACEHOLDER_TEMPERATURE"){
    return String(random(10, 20));
  }

  else if(var == "PLACEHOLDER_HUMIDITY"){
    return String(random(0, 50));
  }

  return String();
}

void setup(){
  Serial.begin(115200);

  WiFi.begin(ssid, password);

  while (WiFi.status() != WL_CONNECTED) {
    delay(1000);
    Serial.println("Connecting to WiFi..");
  }

  Serial.println(WiFi.localIP());

  server.on("/sensor", HTTP_GET, [](AsyncWebServerRequest *request){
    request->send_P(200, "text/html", html, processor);
  });

  server.begin();
}

void loop(){}
Testing the code
To test the code, simply compile it and upload it to your device. Once it finishes, open the Arduino IDE serial monitor and wait for the ESP32 to connect to the WiFi network. When the connection is established, an IP should get printed to the console. Copy it, since it will be needed to reach the server.
Now, open a web browser of your choice and type the following in the address bar, changing #yourIP# by the IP you have just copied:
http://#yourIP#/sensor
You should get an output similar to figure 1, which shows that in the final HTML returned to the client the placeholders were replaced by the simulated measurements.
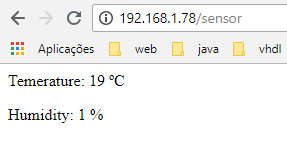
Figure 1 – Final HTML with the placeholders replaced by simulated measurements.
If you go back to the Arduino IDE serial monitor you should see the two placeholder values getting printed, as shown in figure 2. Recall that, as mentioned, the percentage signs are not passed to this function.
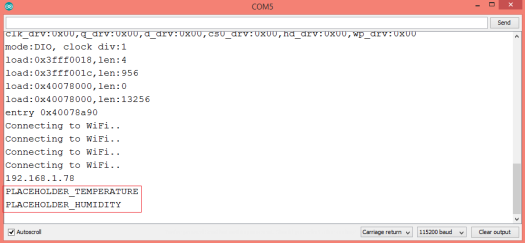
Figure 2 – Template processing placeholders.
DFRobot supply lots of esp32 arduino tutorials and esp32 projects for makers to learn.

Join us at Booth ND32 to explore cutting-edge AI, IoT, and STEM tools like UNIHIKER K10 and Maqueen Plus V3.
NEWS
If you're looking to understand how soil humidity sensors function, this article covers the essential principles behind different types of soil sensors and their applications in gardening and agricultural irrigation.
SELECTION GUIDE
This article will explore how to install and run Qwen2.5 on a Raspberry Pi 5 using the Ollama runtime framework.
REVIEWS Raspberry Pi