CATEGORY
- New Products
- Sales
- All Products
- Arduino >
- LattePanda >
- FireBeetle (ESP32 / ESP8266) >
- Internet of Things - IoT >
- Development Boards > Development Boards
- Raspberry Pi >
- micro:bit >
- Sensors > SensorsLiquid SensorsAir SensorsLiDARRange & Distance SensorsTemperature & Humidity SensorInteractive SensorsLight & Imaging SensorsMagnetic SensorsMotion SensorsPotentiometersCurrent SensorsPressure SensorsFlex SensorsSensor SetGPSIMU SensorsSound SensorsSwitches & ButtonsWeight Sensorse-Health SensorsEncodersOthers
- Gravity >
- Modules >
- Kits >
- Prototyping & Accessories >
- Artificial Intelligence Hardware >
- Robotics >
- Fermion >
- STEM Education >
- Boson >
- PCB Manufacturing
TUTORIALS ESP8266 The objective of this post is to give a brief description of the WiFi Bee, a ESP8266 based board from DFRobot.
The WiFi Bee is a WiFi to Serial module, based on the famous ESP8266 microcontroller, which has a Xbee compatible design [1].
As said in the introductory section, this board is based on the ESP8266, a very powerful 32-bit WiFi enabled microcontroller from Espressif. The ESP8266 has been powering the IoT, specially in the maker’s community, with a wide range of different boards existing on the market.
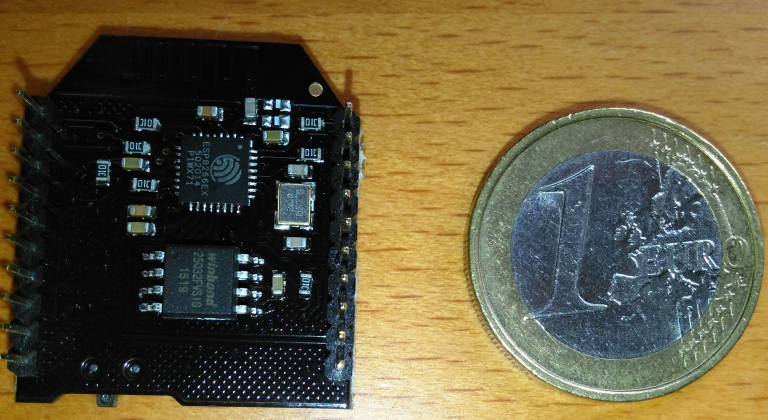
Figure 2 shows the back of the module, where the ESP8266 chip can be seen.
This module comes pre-loaded with a firmware that supports receiving AT commands for a lot of WiFi functionality. You can check here more information about the AT commands functionality.
ESP8266 WiFi Bee at DFRobot store
[1] https://www.dfrobot.com/product-1279.html
ESP8266: DFRobot WiFi Bee board
DFRobot
May 22 2017 915
The objective of this post is to give a brief description of the WiFi Bee, a ESP8266 based board from DFRobot.
Introduction
The WiFi Bee is a WiFi to Serial module, based on the famous ESP8266 microcontroller, which has a Xbee compatible design [1].
The board is sold by DFRobot, a robotics and open source hardware provider [2]. Note that this is just one of the many boards that they sell, and I really encourage you to check their catalog of products.
The Board
As said in the introductory section, this board is based on the ESP8266, a very powerful 32-bit WiFi enabled microcontroller from Espressif. The ESP8266 has been powering the IoT, specially in the maker’s community, with a wide range of different boards existing on the market.
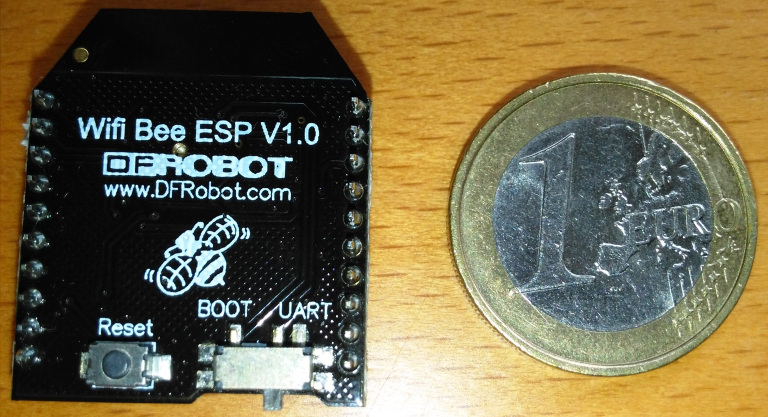
The WiFi Bee board offers a very compact design, compatible with the Xbee slot. In terms of interface, it has only a reset button and a switch to control between flashing and boot modes. You can check in figure 1 a picture of the board. For a sense of scale, the picture was taken alongside a 1 euro coin.

Figure 1 – WiFi Bee module.
Figure 2 shows the back of the module, where the ESP8266 chip can be seen.

Figure 2 – Back of the WiFi Bee module.
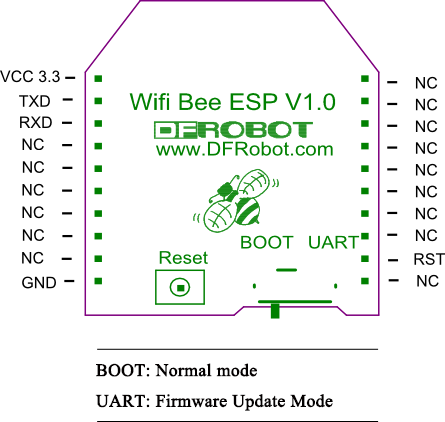
As for the pin configuration, you can check figure 3. The picture was taken from the ESP8266 Wiki of the board. In the figure, you can also see the previously mentioned reset button and the switch to choose between normal boot mode and firmware update mode.

Figure 3 – Pin diagram of the WiFi Bee board. Taken from [3].
From this diagram, we can conclude that this is a board mainly oriented to the connectivity to other devices, since besides the power and reset pins, only the serial port pins are exposed.
So, it is ideal for connecting, for example, to an Arduino board. This way, the WiFi Bee can take care of all the WiFi related functionality, leaving the Arduino free for the remaining application. Just for curiosity, this was the architecture implemented in a previous project of mine of a smart medication dispenser, where I used an Arduino for taking care of all the interaction with sensors and actuators, and a ESP8266 for taking care of the WiFi connectivity.
Note that the ESP8266 works at 3.3V, so we cannot directly connect it to Arduino boards running at 5V. Thus, to connect the WiFi Bee to an Arduino board, the easiest way is to use a Xbee shield for arduino, since it has a 3.3V to 5V converter [4].
It’s also important to refer that the WiFi Bee already has an antenna on the PCB, allowing to connect to a WiFi network out of the box.
AT Commands Firmware
This module comes pre-loaded with a firmware that supports receiving AT commands for a lot of WiFi functionality. You can check here more information about the AT commands functionality.
At the end of the section of the previous link, you can find a document with all the AT commands available to send to the module. Nevertheless, please take in consideration that the firmware has been evolving with time, and newer versions introduce some alterations to the commands.
This functionality is very useful because it lets us test the board straight out of the box, without the need for creating custom code. As we will see in a future post, we will just need to have the Arduino IDE to do the first interaction with the module. No Arduino board is needed for simple tests.
Nevertheless, since the WiFi Bee doesn’t have an USB header, we need a serial to USB adapter, so we can connect it to a computer. The easiest way to achieve this is by using this Xbee to USB adapter.
Custom Programs
Although the module comes with the previously mentioned AT commands firmware, we can easily re-flash it with a custom program. As we have been covering in previous tutorials, one of the easiest ways to program the ESP8266 is by using the Arduino IDE support.
Learning Resources
DFRobot has a ESP8266 Wiki for the board, which has a lot of good resources for getting started. Naturally, this being an ESP8266 based board, there are plenty of other resources around the web, including the ones presented in this blog.


