
CATEGORY
- New Products
- Sales
- All Products
- Arduino >
- LattePanda >
- FireBeetle (ESP32 / ESP8266) >
- Internet of Things - IoT >
- Development Boards > Development Boards
- Raspberry Pi >
- micro:bit >
- Sensors > SensorsLiquid SensorsAir SensorsLiDARRange & Distance SensorsTemperature & Humidity SensorInteractive SensorsLight & Imaging SensorsMagnetic SensorsMotion SensorsPotentiometersPressure SensorsCurrent SensorsFlex SensorsGPSSensor SetIMU SensorsSound SensorsSwitches & ButtonsWeight Sensorse-Health SensorsEncodersOthers
- Gravity >
- Modules >
- Kits >
- Prototyping & Accessories >
- Artificial Intelligence Hardware >
- Robotics >
- Fermion >
- STEM Education >
- Boson >
- PCB Manufacturing


$USD
PROJECTS LattePanda Foreword
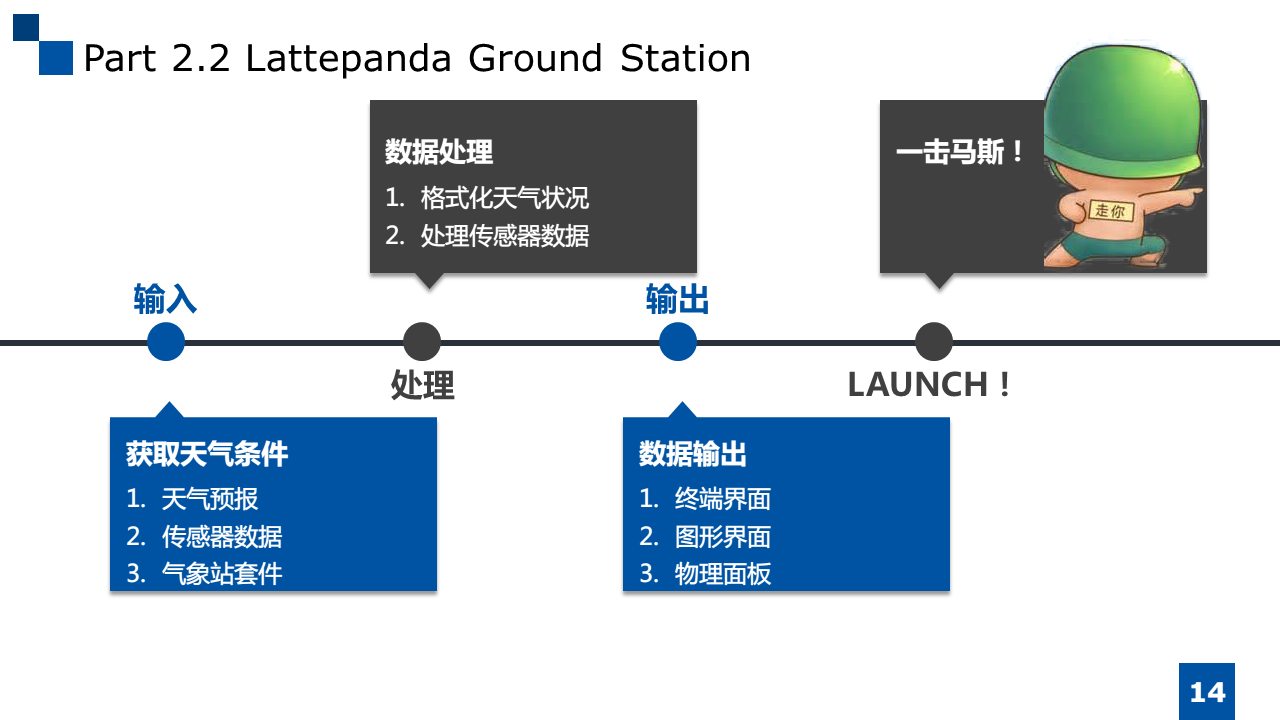
At present, we can acquire data on atmospheric pressure, wind force, cloud layer and visibility, etc., but the quadrotor flies at low altitude and will not be affected by jolt and freezing. Therefore, we make the following design:
1. The current weather, wind force, atmospheric pressure, visibility, etc. are acquired and weather conditions of the next day are predicted through the online weather forecast API
2. The sensor data is acquired to show the current environmental conditions (Due to lack of a specialized sensor, the meteorological station suite and other MCU will be connected to and a new sensor will be purchased in the future to acquire the data such as atmospheric pressure)
3. Display results:
-Terminal program (CLI): Python Shell|Windows Command Prompt
- Graphical interface (GUI): Graphic program or Web Interface
- Physical panel: LCD, physical button and LED light, etc. shall be used to indicate the take-off conditions
LattePanda Ground Station Project P2.2 Take-off Conditions Detection System (CLI & GUI) 1
DFRobot
Dec 06 2017 651
Foreword
Original article. Be sure to indicate link in case of reproduction and quotation. Due to limited ability, welcome to make correction in case of any careless omission.
The article is written with Markdown. To get better reading experience and normal link and picture display, please access my blog for the original article.
http://www.cnblogs.com/sjqlwy/p/lattepanda_pyui.html
UPDATE: Part 2: [Tongsou Xianqi] LattePanda Ground Station Project P2.2 Take-off Conditions Detection System 2
http://www.dfrobot.com.cn/community/forum.php?mod=viewthread&tid=25204&page=1#pid94443
I'm busy and tired recently. Please forgive me for the slow update. Welcome to PM in case of any question.
Test environment of this article: LattePanda: Windows 10 x64; Arduino 1.8.2; Python 3.6 + pyFirmata; TeamViewer 12|TightVNC C&S; host; Windows 7 x64
Six meteorological factors affecting the airplane flight
From: http://www.weather.com.cn/science/qxbk/jt/09/392758.shtml
Atmospheric pressure | Wind |
Cloud | Visibility |
Jolt | Freezing |
1. The current weather, wind force, atmospheric pressure, visibility, etc. are acquired and weather conditions of the next day are predicted through the online weather forecast API
2. The sensor data is acquired to show the current environmental conditions (Due to lack of a specialized sensor, the meteorological station suite and other MCU will be connected to and a new sensor will be purchased in the future to acquire the data such as atmospheric pressure)
3. Display results:
-Terminal program (CLI): Python Shell|Windows Command Prompt
- Graphical interface (GUI): Graphic program or Web Interface
- Physical panel: LCD, physical button and LED light, etc. shall be used to indicate the take-off conditions
Weather Forecast API to Acquire Weather Conditions (Input)
The most simple and accurate method is to acquire weather forecast. We may use a service API provided by any website home and abroad here and check various free and charged services on Baidu API Store. I used API such as Yahoo and Weather previously. I by chance found Awesome_APIs List arranged by TonnyL, a net friend on github this time. This list is great. Thank you, TonnyL! If possible, you may go to Star or make a donation.
We select the API Central Weather Forecast (unofficial), because its data is accurate and it is very easy to use.
The using method is clearly described and the data format is json. In case of no formatting, the output result shall be as follows:
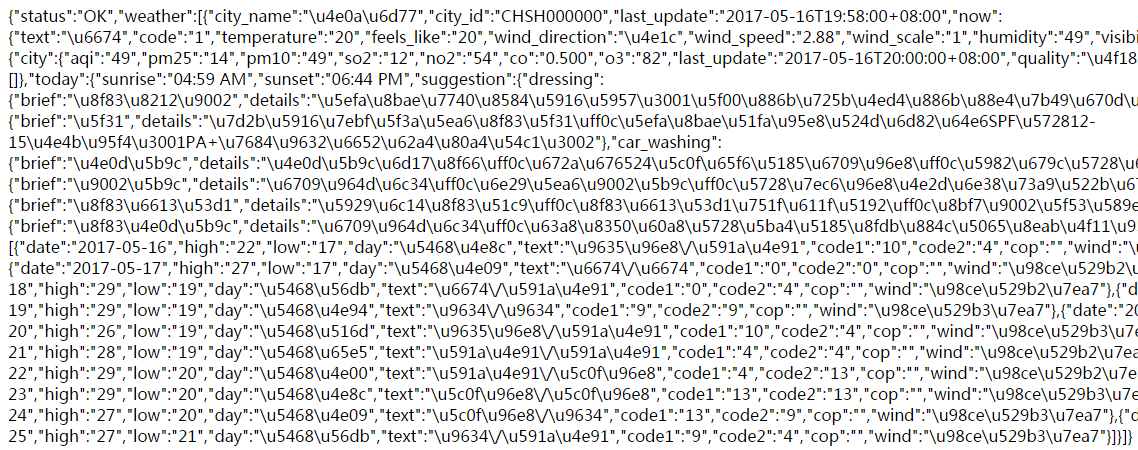
Whereof, \uXXXX is JS string. Although many small tools such as curl and httpie can finish decoding with json formatting tool, we use Python + requests library to achieve the data acquisition and processing for the convenience of subsequent expansion.
Weather Conditions Acquisition
Test environment: Python 3.6.1 for Windows; ;pyFirmata 1.0.3 (pyserial needed); requests 2.14.2
The codes are as follows:#!/usr/bin/env python3
#-*utf-8*-
import requests
def get_weather():
# use api from [url=https://github.com/jokermonn/-Api/blob/master/CenterWeather.md]https://github.com/jokermonn/-Api/blob/master/CenterWeather.md[/url]
weather = requests.get('http://tj.nineton.cn/Heart/index/all',params = 'city=CHJS070000')
return weather.json()
status = get_weather()['status']
cond = get_weather()['weather'][0]['now']
tomorrow = get_weather()['weather'][0]['future'][1]
if status == 'OK':
print("********当前天气********")
print("当前城市:{0}\n当前天气状况: {1}\n温度: {2} ℃\n风向: {3}\n风速: {4} m/s\n风力大小: {5}\n空气湿度: {6}\n能见度: {7} km\n气压: {8} hPa".format(get_weather()['weather'][0]['city_name'], cond['text'], cond['temperature'], cond['wind_direction'], cond['wind_speed'], cond['wind_scale'], cond['humidity'], cond['visibility'], cond['pressure']))
print("********明日天气********")
print("明日天气情况:{0}\n风力大小:{1}".format(tomorrow["text"], tomorrow['wind']))
if '雨' not in tomorrow['text']:
affordable_wind = ('风力0级', '风力1级', '风力2级', '风力3级', '风力4级')
if tomorrow['wind'] in affordable_wind:
# 后续加入字体颜色
print("明日适宜飞行!")
# 绿灯亮
else:
# 后续加入字体颜色
print('明日不宜飞行!')
# 红灯亮
else:
print('failed to fetch weather condition of XuZhou!')
#!/usr/bin/env python3
#-*utf-8*-

import requests

def get_weather():
    # use api from [url=https://github.com/jokermonn/-Api/blob/master/CenterWeather.md]https://github.com/jokermonn/-Api/blob/master/CenterWeather.md[/url]
    weather = requests.get('http://tj.nineton.cn/Heart/index/all',params = 'city=CHJS070000')
    return weather.json()

status = get_weather()['status']
cond = get_weather()['weather'][0]['now']
tomorrow = get_weather()['weather'][0]['future'][1]

if status == 'OK':
        print("********当前天气********")
        print("当前城市:{0}\n当前天气状况: {1}\n温度: {2} ℃\n风向: {3}\n风速: {4} m/s\n风力大小: {5}\n空气湿度: {6}\n能见度: {7} km\n气压: {8} hPa".format(get_weather()['weather'][0]['city_name'], cond['text'], cond['temperature'], cond['wind_direction'], cond['wind_speed'], cond['wind_scale'], cond['humidity'], cond['visibility'], cond['pressure']))
        print("********明日天气********")
        print("明日天气情况:{0}\n风力大小:{1}".format(tomorrow["text"], tomorrow['wind']))
        if '雨' not in tomorrow['text']:
                affordable_wind = ('风力0级', '风力1级', '风力2级', '风力3级', '风力4级')
                if tomorrow['wind'] in affordable_wind:
                        # 后续加入字体颜色
                        print("明日适宜飞行!")
                        # 绿灯亮
        else:
                # 后续加入字体颜色
                print('明日不宜飞行!')
                # 红灯亮
else:
        print('failed to fetch weather condition of XuZhou!')
The implementation effect is as follows:

Notes:
- Python2 is slightly different from Python3 in terms of grammar. It is recommended to read Python Tutorial written by Liao Xuefeng and free A Byte of Python3 (Chinese version).
- The requests library is easy to use, and provided with json formatting function internally. Although there are many other better libraries or tools available, the exquisite requests library can reduce the learning costs and lay the foundation for the subsequent learning of web crawler.
- Please refer to the json return example of such API. Pay attention to the dictionary {} and sequence [] which are specially explained in A Byte of Python3 (Chinese version).
- I recommend using the character string format() method to carry out formatting output.
-params = 'city=CHJS070000' is the code of my hometown Xuzhou. Refer to the database file provided by the author for the specific city code.
-Computer is only my hobby, so the code quality is very low. Welcome to give suggestions.
- When TightVNC is used at both Server and Viewer terminals, the text can be directly copied and pasted, but Chinese text will have messy codes here due to different coding of two files or built-in code problem of TightVNC. Nevertheless, no messy codes will be generated in case of file transfer function used.
-I plan to add the font colors to indicate conditions suitable or not suitable for take-off later. Windows and Linux achieve different functions, so the functions are not integrated temporarily considering the transportability. You may refer to Python achieving windows CMD command line color output and color setting of Python command line output.
Sensor Data Acquisition and Physical Button Control
The sensor data acquisition and physical button control are introduced somewhat in the previous article LattePanda---In-depth Learning of Firmata Communication. We firstly use the simple pyFirmata library for demonstration, simulation and digital sensor reading and writing. The final effect is as follows: Read the data of photosensitive sensor and temperature & humidity sensor for display (simulation and digital sensor reading and writing), and judge whether the weather conditions tomorrow allow take-off based on the weather forecast. If so, the green LED will be on for 5 s. Otherwise, the red LED will be on for 5 s (number write-in). The large physical button will be added to control (digit reading) in the future. The codes are as follows:from pyfirmata import Arduino, util
from time import sleep
# 初始化串口
board = Arduino('COM5')
print("********传感器数据********")
it = util.Iterator(board)
it.start()
board.analog[0].enable_reporting()
sleep(1) # 缓冲时间
# 待补充DHT11以及校准光敏传感器
print("环境亮度:{0}\n环境温度:{1}\n环境湿度:{2}\n".format(board.analog[0].read(), "N/A", "N/A"))
board.analog[0].disable_reporting()
# 绿灯亮
board.digital[9].write(1)
sleep(5)
board.digital[9].write(0)
# 红灯亮
board.digital[10].write(1)
sleep(5)
board.digital[10].write(0)
from pyfirmata import Arduino, util
from time import sleep

# 初始化串口
board = Arduino('COM5')

print("********传感器数据********")
it = util.Iterator(board)
it.start()
board.analog[0].enable_reporting()
sleep(1) # 缓冲时间
# 待补充DHT11以及校准光敏传感器
print("环境亮度:{0}\n环境温度:{1}\n环境湿度:{2}\n".format(board.analog[0].read(), "N/A", "N/A"))
board.analog[0].disable_reporting()

# 绿灯亮
board.digital[9].write(1)
sleep(5)
board.digital[9].write(0)

# 红灯亮
board.digital[10].write(1)
sleep(5)
board.digital[10].write(0)
Notes:
- Pleas fill in the correct serial port number
- In case of any problem of third-party StandardFirmataPlus firmware, LED cannot be switched off after being switched on. It will return to normal after the official StandardFirmata firmware is re-burned, waiting to re-verify the problem.
-During analog port operation, it is recommended to start an iterator thread for processing. Otherwise, the development board will send data to the serial port continuously, until the overflow of serial port. Please refer to the official tests.py for more examples and using methods.
- After reporting is switched on, please delay before reading the analog quantity. Otherwise, the sensor value may not be acquired; in addition, please disable after single reading is finished. Otherwise, the data will be always sent (Tx white indicator light is normally on)
- pyFirmata library will be replaced by pyMata-aio in the future. It supports the latest firmata protocol, uses the asynchronous interface and can automatically detect the Arduino serial port.
-A9 and A10 are connected to the green and red LEDs respectively.

Recent Blogs

Run Qwen2.5 on Raspberry Pi 5 using Ollama
This article will explore how to install and run Qwen2.5 on a Raspberry Pi 5 using the Ollama runtime framework.
REVIEWS Raspberry Pi Dec 11 2024

Run Gemma2 on Raspberry Pi 5 using Ollama
In this article, we will delve into the process of installing and running the SLM(small language model) Gemma2 on the Single Board Computer (SBC) Raspberry Pi 5 using the Ollama runtime framework.
REVIEWS Raspberry Pi Dec 11 2024

Run phi3.5 on Raspberry Pi 5 using Ollama
In this write-up, we delve into the process of installing and executing phi3.5-3.8b on a Raspberry Pi 5, leveraging the Ollama runtime framework.
REVIEWS Raspberry Pi Dec 09 2024