Introduction
The EMG sensor is cooperatively launched by DFRobot and OYMotion , and can reflect muscle and neural activities of human by detecting sEMG. This sensor integrates a filtering circuit and an amplified circuit. It amplifies minimal sEMG within ±1.5mV 1000 times and depresses noises (especially power frequency interference) by differential input and analog filter circuit. The output signal is analog,which takes 1.5V as the reference voltage. The output voltage range is 0~3.0V. The signal strength is depends on muscle activities. The output signal waveform indicates the muscle activity and helps to analyse and research the sEMG signals. Specifically, we can use Arduino as a controller to detect muscle activities, e.g. check whether the muscle is tense; the muscle strength;etc. This active induction sensor can provide high quality signal collection and it is easy to use. Simple preparations are needed to apply the module to both static or dynamic areas. The dry electrode must be applied to the module and good quality signals can be read even without conductive gel. Compared with disposable conductive gel needed by medical electrodes, it is more convenient to use our dry electrode and has longer service life. Therefore, it is more suited to common users. Measurements with an analog EMG sensor are noninvasive, convenient and can be applied to an array of human-computer interactions. With the development of microcontrollers and integrated electric circuits, EMG circuits and sensors have not just been applied to traditional medical muscle detection researches but also control systems.
The supply voltage range is 3.3~5.5V; The supply current should not be less than 20mA; The ripple current and disturbance current should be as low as possible. Stabilized DC voltage is recommended.
The effective spectrum range is 20Hz~500Hz, and the ADC converter which has higher than 8-bit resolution and 1 KHz frequency are recommended to take samples and digitized to keep original information.
Placing the metal dry electrode should consistent with the direction of muscle.
The product is not a professional medical device and cannot diagnose and cure disease as an assistant device.
Specification
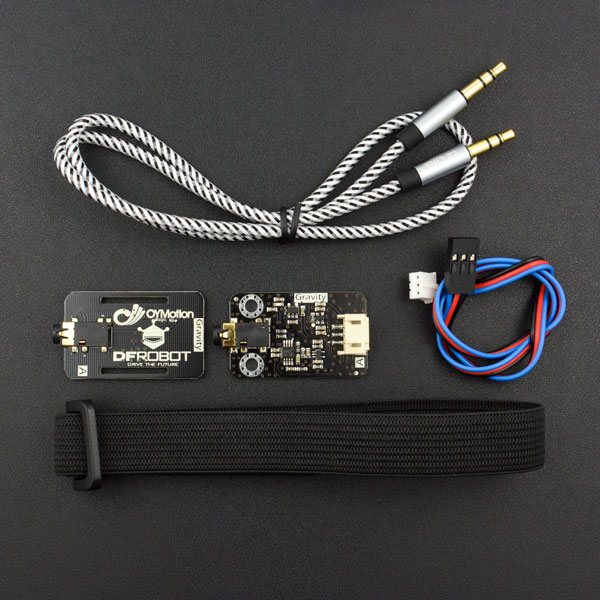
- Signal Transmitter Board
- Supply Voltage: +3.3V~5.5V
- Operating Voltage: +3.0V
- Detection Range: +/-1.5mV
- Electrode Connector: PJ-342
- Module Connector: PH2.0-3P
- Output Voltage: 0~3.0V
- Operating Temperature: 0~50℃
- Size: 22mm*35mm (0.87inch*1.38inch)
- Dry Electrode Board
- Electrode Connector: PJ-342
- Wire Length: 50cm(19.69inch)
- Plate Size: 22 * 35 mm(0.87inch*1.38inch )
- weight: 36g
Board Overview

| Num | Label | Description |
|---|---|---|
| 1 | A | Analog Signal Output(0~3.0V) |
| 2 | + | Power Supply Anode(3.3~5.5V) |
| 3 | - | Power Supply Cathode(0V) |
| 4 | PJ-342 | Probe Wiring Connector |
Tutorial
The tutorial will show you how to use the analog EMG sensor by printing electromyogram waveform with Serial Plotter of Arduino IDE.
Requirements
- Hardware
- DFRduino UNO R3 (or similar) x 1
- Signal Transmitter Board x1
- Dry Electrode Plate x1
- Dry Electrode Cable x1
- Gravity Analog Cable 3Pin(or Dupont Wires) x1
- Software
- Arduino IDE Click to Download Arduino IDE from Arduino®.
Connection Diagram

Sample Code
This sample code needs EMGFilters library file, please download and install the EMGFilters Library file. How to install Libraries in Arduino IDE?
Calibration
 Calibration is recommended for every time when you use it, for the EMG signal is different in different position, even on the same person.
Modify the variable Threshold in the sample code to 0, namely: static int Threshold = 0;
Upload the sample code to Arduino control board and open the serial monitor of Arduino IDE to check the printed value.
Relax the arm muscle and check the printed value of serial port. Calm down and relax for a while to check and record the maximum value printed by the serial monitor. If the value is too large, such as more than 1000, you can try fine-tune position of the dry electrode.

Modify the variable Threshold in the sample code to the recorded maximum value, and reload the sample code to Arduino control board.
Open the serial plotter of arduino IDE and the myoelectricity waveform could be seen.
In general, the waveform is a line of 0 when the muscle is relaxed, shown as below. It is normal along with occasional peak waveform.

Obviously myoelectricity waveform could been seen in the process of making a fist, shown as below.

Basic Application
This application explains the way to distinguish whether the EMG signal from making a fist. It can be expanded to be applied to push-up counts, dumbbell curl counts, etc. It also can be applied to human-computer interaction, such as play Flappy Bird with EMG signal made by a fist. Please refer to the Chapter 4: 4.1 Preparation and 4.2 Connection Diagram for hardware connection and sensor position. This sample code needs EMGFilters library file, please download and install the EMGFilters Library first. How to install Libraries in Arduino IDE?
Calibration is recommended for every time you use it, for the EMG signal is different in different position even of the same person.
In this code, the default variable threshold is 0, which means in the calibration mode. Modify threshold to nonzero means exit the calibration mode. So if you want to re-calibrate the sensor,you just need to modify threshold value to 0, namely, unsigned long threshold = 0;
Upload the code to Arduino control board and open serial plotter of Arduino IDE to check the maximum Y-axis value.
Make a fist gently and loose it gently, repeatedly. Then observing and recording the maximum Y-axis value. As shown in the following picture,the result of the maximum should be around 400.

Modify the variable threshold to the recorded maximum value. Recommend to modify it to the maximum +100 to improve anti-interference. Reload the sample code to the Arduino control board.
Open the serial monitor of Arduino IDE, make a fist and loose it for once then you can see the printed value. Making a fist gently will not count and making a fist with more power will not increase the count value. Only a strong fist and loose can make sense. In this way, we realize the precise counts.
If you found the count accumulated when loose the fist, it would be caused by low threshold value. You can add extra 100 on the variable threshold , then reloading the sample code to the Arduino control board and check the result. You can repeat this step until the result is satisfied.

This sensor can count the muscle activities precisely after calibration on a specific point. It can be applied to push-up counts, dumbbell curl counts, etc. It also can be applied to human-computer interaction, such as play Flappy Bird with EMG signal made by fist. Besides the basic function, the analog EMG sensor can also detect muscle activity strength by signal intensity. You can refers to the More Documents in the end page of Wiki.
FAQ
| Q&A | Some general Arduino Problems/FAQ/Tips |
|---|---|
| Q | Where should I put the dry electrode? Is there any special requirement? |
| A | In general, the corresponding 3 metal dry electrode plate needs not pay attention to the reference voltage. It only need to consistent with the direction of muscle. You can refer to the image as below of the placement. |

For any questions, advice or cool ideas to share, please visit the DFRobot Forum.