Introduction
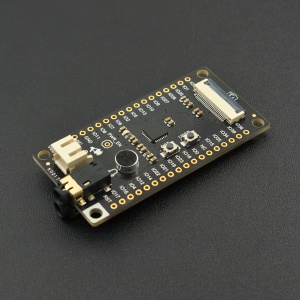
DFRobot FireBeetle series are low power consumption development modules designed for Internet of Things (IoT). The FireBeetle Covers-Camera & Audio Media Board is a multimedia device for IoT that provides interfaces to connect NAU8822 CODEC IIS, OV7725 camera, SD card (SDIO), earphone and microphone.
Moreover, it equips with a mini MIC input interface. The NAU8822 CODEC IIS can drive both 12@8Ω BTL loudspeaker and 40mW @16Ω earphone. The direct connection is supported. Meanwhile, NAU8822 supports DAC sound signal acquisition and programmable microphone amplifier. The recording is available when input voices with onboard MIC interface or microphone then save it to SD card. What's more, the function to take photos is available when connected to an OV7725 CAMERA.
With any FireBeetle main boards (e.g. ESP32 main board), the FireBeetle Covers-Camera & Audio Media Board could be a MP3, a recorder, a camera. Once connected to the Internet, it could be an Internet radio, a cloud image recognition.
NOTE 1. This media board only supports FireBeetle ESP32 main board at present, for other main boards do not equipped with IIS interface.
2. The flat ribbon cable of camera is relatively easy-to-break, please be careful and light in connection. The camera shot must be opposite to the SD card slot.
3. Do not support video shooting and transmission.
Specification
- Operating Voltage: 3.7V~5.5V (VCC)
- Output Voltage: 3.3V
- User-defined Button: tested by IO16(DI)
- RESET x1
- SD Card:
- Bus Interface: SDIO Protocol
- Default Transmission Rate: 10MHz
- Max. Transmission Rate: 20MHz
- Camera OV7725: (data as below is just for reference; some functions could not be realized by ESP32 now).
- Photosensitive/Light-sensitive Array: 640*480
- Optical Size: 1/6"
- Angle of View: 25°
- SCCB Standard Interface
- Output Pixel Format: Raw RGB,RGB(RGB4:2:2 ,RGB565/555/444),YCbCr (4:2:2)
- Image Size: VGA,QVGA and CIF to 40x30
- VarioPixel Subsampling
- Auto Image Control: auto exposure control (AEC), auto gain control (AGC), auto white balance (AWB), auto band filter and auto black level (ABL) calibration.
- Image Quality Control: saturation, tone, gamma, clarity and anti-interference
- ISP: noise reduction and defect calibration
- Lens Shading Correction
- Auto Saturation Adjustment
- Frame Synchronization
- Fixed-focus
- NAU8822:
- DAC:94dB SNR , -84db THD
- ADC:90dB SNR , -80dB THD
- Integrated BTL loudspeaker drive: 1W @ 8Ω
- Integrated earphone drive: 40mW @ 16Ω
- Integrated programmable microphone amplifier
- Typical Sampling Rate: 8KHz, 48KHz, 96KHz, 192KHz
- Standard Video Interface: PCM and I2S
- MIC:
- Type: Electret Capacitor
- Output: analog
- Direction: omnidirectional
- Frequency Range: 100Hz~15KHz
- Sensitivity: -43dB ±5dB @ 94dB SPL
- Signal-to-noise Ratio: 58Db
Function Diagram

Board Overview

| ESP32 | SD Card | NAU8822 | Camera |
|---|---|---|---|
| IO0 | DACIN | RST | |
| IO1 | |||
| IO2 | DATA0 | ||
| IO3 | |||
| IO4 | DATA1 | ||
| IO5 | BLCK | D3 | |
| IO6 | |||
| IO7 | |||
| IO8 | |||
| IO9 | |||
| IO10 | |||
| IO11 | |||
| IO12 | DATA2 | ||
| IO13 | DATA3 | ||
| IO14 | CLK | ||
| IO15 | CMD | ||
| IO16 | |||
| IO17 | LRCK | D2 | |
| IO18 | D4 | ||
| IO19 | D5 | ||
| IO21 | XCLK | ||
| IO22 | MCLK | PCLK | |
| IO23 | HREF | ||
| IO25 | VSYNC | ||
| IO26 | SDIO | SDA | |
| IO27 | SCLK | SCL | |
| IO34 | D8 | ||
| IO35 | D9 | ||
| IO36 | D6 | ||
| IO39 | ADCOUT | D7 |
Tutorial
Requirements
- Hardware
- ESP32 x1
- FireBeetle Covers-Camera&Audio Media Board x1
- OV7725 Camera x1
- Micro SD Card (FAT32 File System) x1
- Software
- Arduino IDE (Version requirements: V1.8+), click to Download Arduino IDE from Arduino®
Play
Download programs as below to ESP32 main control board and plug a SD Card with test1.wav and test2.wav
Sample Code (Music Play)
Please download and install FireBeetle Covers-Camera&Audio Media Board library files.
How to install Libraries in Arduino IDE
-
Program Function: The Module would operate as follows when pressed: play test1.wav>>pause>>continue>>mute>>Volume:50>>stop>>play test2.wav
-
Functions:
Initialize SD card in the beginning.
Enter AUDIO mode, state its mode (AUDIO / CAMERA) in use when the SD card is initialized.
Set earphone volume and loudspeaker volume separately. They can be used at the same time and the volume range is 0~99. It should be set before the player initialization and can be used to change volumes in the play.
Mute: enable loudspeaker and earphone to Mute, available in the play.
Initialize the player: to prepare for calling the player function in AUDIO
Select a music file (test1.wav at here) that stored in the SD card and call to play.
Player control: to play, pause and stop the music play in order.
Record
Once the board connected to microphone by MIC, the other onboard microphone is disabled.
Download programs as below to ESP32 main control board and plug a SD Card.
Program Function:
Pressing to record when downloaded, repressing the button to stop and save the file: record.wav to SD card and press to play it.
- Functions:
Initialize SD card in the beginning.
Enter AUDIO mode, state its mode (AUDIO / CAMERA) in use when the SD card is initialized.
Initialize the recorder: to prepare for calling the record function in AUDIO.
Name the record file that will be saved to the SD card, call and play.
Recorder control: to play, pause, stop and save in order.
Take Photos
- Due to the limitation of ESP32 processing performance, it only supports 320x240 QVGA resolution for now.
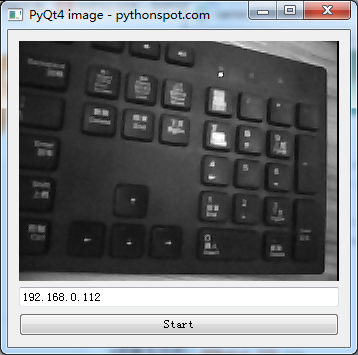
- And the network transmission picture only supports GRAYSCALE photo, the next version will supports colorful image.
- Fixed focus, no need to adjust.
Download programs as below to ESP32 main control board and plug a SD Card
-
Program Function: Press the button to take a photo, saving as photo1.bmp. Press the button again to take another photo, saving as photo2.bmp. Please pay attention that you can keep pressing button to take photo, but it will cover photo1 and photo2 in turn.
-
Functions:
Initialize SD card in the beginning.
Enter CAMERA mode, state its mode (AUDIO / CAMERA) in use when the SD card is initialized.
Connect to Wi-Fi, SSID and PASSWORD are the name and the password of Wi-Fi been used.
Set image frame size and it need to be called in CAMERA mode, supporting QQVGA (160x120) QQVGA2 (128x160) QICF (176x144) HQVGA (240x160) QVGA (320x240).
Set pixel format and it need to be called in CAMERA mode, supporting RGB555 (colorful), GRAYSCALE.
Connect to Wi-Fi and transmit CAMERA data to the Internet, the CAMERA shooting (GRAYSCALE) can be checked by referring the tutorial and image as below.
Function to take a photo: Name the image file (photo1.bmp in SD card at here) to be saved, call the function to take a photo and save.
- Tutorial to get a photo:
-
Click to download the software tool in need.
-
Open the software tool.
-
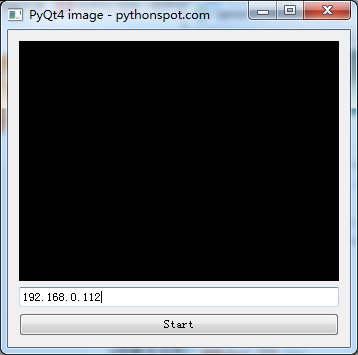
- Run the program and open the serial port to check IP address.
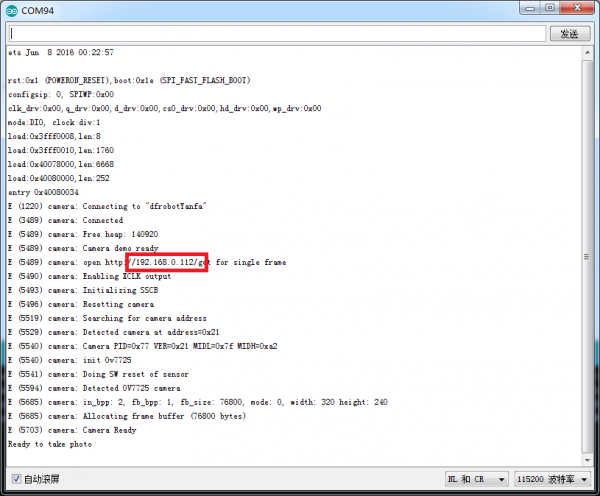
- Input IP address. (PC and ESP32 main board should be in a same network segment), click start to take a photo in a real time.
SD Card Read & Write
- ESP32 SDMMC library of official Arduino can be directly used in SD card socket of FireBeetle Covers-Camera&Audio Media Board.
- Plug SD card and download the below program to ESP32 mainboard.
Result

Compatibility Test
| MCU | Support | Not Support |
|---|---|---|
| FireBeetle-Board328P | √ | |
| FireBeetle-ESP32 | √ | |
| FireBeetle-ESP8266 | √ |
Dimension Diagram

FAQ
| Q&A | Some general Arduino Problems/FAQ/Tips |
|---|---|
| Q | What main boards does the FireBeetle Covers-Camera & Audio Media Board support? |
| A | Due to the interface, the expansion board only support FireBeetle Board-ESP32 mainboard with its IIS interface. |
| Q | How to deal with the problem that cannot download when plugged the expansion board? |
| A | Please unplug the expansion board and plug it until the mainboard downloaded program when the plugged mainboard cannot download program. |
| Q | Does it supports take a photo and record at the same time? |
| A | Due to the lacking of pin source, the expansion board cannot support take a phone and record simultaneously. |
For any questions, advice or cool ideas to share, please visit the DFRobot Forum.
More Documents
FAQ
For any questions, advice or cool ideas to share, please visit the DFRobot Forum.