Introduction
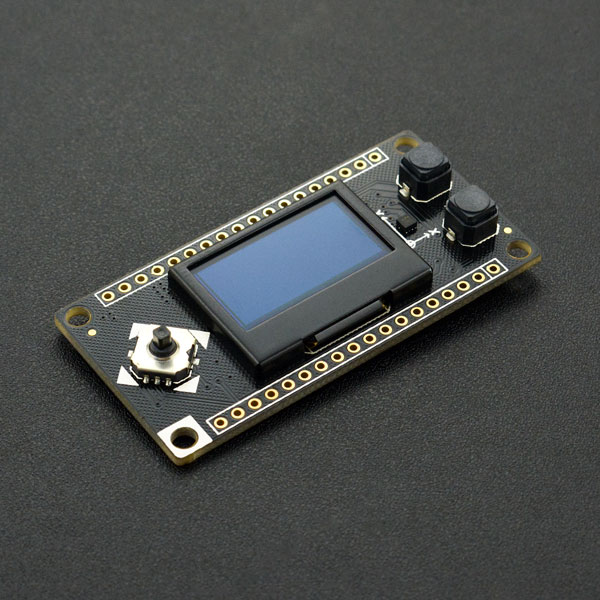
DFRobot FireBeetle firefly series is low-power development component designed for the IoT. This FireBeetle covers display module is equipped with 128x64 resolution OLED and new version of SSD1360 driver, uses I2C interface, supports for the Arduino library and microPython, fully compatible with the Gravity I2C OLED-2864 screen. OLED screen has a protective frame to protect the screen, it prevents the finger from being scratched on the edge of the glass. The OLED 12864 display module also integrates the GT30L24A3W Chinese / foreign font library chip and the BMA220 three-axis accelerometer. In addition, the FireBeetle Covers-OLED12864 display features an analog directional key and two independent digital keys A and B.
Specification
- Voltage Range: 3.7V-5.5V
- 2 User Buttons: Using digital port D3, D8 detection mode
- 5-way Switch: Using analog port A0 detection mode
- Three- axis Accelerometer BMA220: IIC
- Data Bus: IIC
- Dimension: 0.079x0.079x0.035in/2x2x0.9mm
- Resolution: 6 bit
- Range: 2/4/8/16g
- Power Consumption: 250uA
- OLED
- Model: UG-2864HLBEG01
- Dimension: 0.96in
- Color: blue
- Data Bus: IIC
- Pixel:128x64
- Font Chip: GT30L24A3W
- Data Bus: SPI
- Character Set:
- GB18030 Simplified Chinese/Traditional Chinese
- KSC5601 Korean
- JIS0208 Japanese
- 180 Foreign Font
- Support for Multinational Unicode
- IS08859 and CODE PAGE
- Chinese Character Size:12 dot matrix, 16dot matrix, 24dot matrix
- Foreign Character Size:16 dot matrix, 24 dot matrix
- Working Current: 12mA
Function Diagram

- A<->D3
- B<->D8
- 5-way Switch<->A0
Pin Out

 NOTE: NC do not need to connect, and the VCC is the power supply voltage output.
Tutorial
Preparation
- Hardware
- 1 x ESP32
- 1 x FireBeetle Covers-OLED12864
- Software
NOTE: All of the following examples are belong to DFRobot_OLED12864 library files.
Image
- Open Dfrobot_OLED12864 Image Demo
- Function: After download this demo the screen will display our logo (notice that the picture file "images.h" has been in the project folder, if you need to replace the picture, you can use The Dot Factory to generate bitmaps)
- Function Declaration:
- Create an object and write the I2C address
DFRobot _OLED12864 display(0x3c)
- Initialize OLED and library
init()
flipScreenVertically
clear()
- Import the specified width-high data at the x, y-axis position, starting at the top left corner.
drawXbm(0, 0, Picture_width, Picture_height, Picture_bits)
- Flush the data from OLED to the screen. If not called, the data will only be stored in the OLED and will not be displayed.
display()
Paint
- Open DFRobot_OLED12864 Drawing Demo
#include "DFRobot_OLED12864.h"
DFRobot_OLED12864 display(0x3c);
void drawLines()
{
for (int16_t i=0; i<DISPLAY_WIDTH; i+=4) {
display.drawLine(0, 0, i, DISPLAY_HEIGHT-1);
display.display();
delay(10);
}
for (int16_t i=0; i<DISPLAY_HEIGHT; i+=4) {
display.drawLine(0, 0, DISPLAY_WIDTH-1, i);
display.display();
delay(10);
}
delay(250);
display.clear();
for (int16_t i=0; i<DISPLAY_WIDTH; i+=4) {
display.drawLine(0, DISPLAY_HEIGHT-1, i, 0);
display.display();
delay(10);
}
for (int16_t i=DISPLAY_HEIGHT-1; i>=0; i-=4) {
display.drawLine(0, DISPLAY_HEIGHT-1, DISPLAY_WIDTH-1, i);
display.display();
delay(10);
}
delay(250);
display.clear();
for (int16_t i=DISPLAY_WIDTH-1; i>=0; i-=4) {
display.drawLine(DISPLAY_WIDTH-1, DISPLAY_HEIGHT-1, i, 0);
display.display();
delay(10);
}
for (int16_t i=DISPLAY_HEIGHT-1; i>=0; i-=4) {
display.drawLine(DISPLAY_WIDTH-1, DISPLAY_HEIGHT-1, 0, i);
display.display();
delay(10);
}
delay(250);
display.clear();
for (int16_t i=0; i<DISPLAY_HEIGHT; i+=4) {
display.drawLine(DISPLAY_WIDTH-1, 0, 0, i);
display.display();
delay(10);
}
for (int16_t i=0; i<DISPLAY_WIDTH; i+=4) {
display.drawLine(DISPLAY_WIDTH-1, 0, i, DISPLAY_HEIGHT-1);
display.display();
delay(10);
}
delay(250);
}
void drawRect(void)
{
for (int16_t i=0; i<DISPLAY_HEIGHT/2; i+=2) {
display.drawRect(i, i, DISPLAY_WIDTH-2*i, DISPLAY_HEIGHT-2*i);
display.display();
delay(10);
}
}
void fillRect(void)
{
uint8_t color = 1;
for (int16_t i=0; i<DISPLAY_HEIGHT/2; i+=3) {
display.setColor((color % 2 == 0) ? BLACK : WHITE);
display.fillRect(i, i, DISPLAY_WIDTH - i*2, DISPLAY_HEIGHT - i*2);
display.display();
delay(10);
color++;
}
display.setColor(WHITE);
}
void drawCircle(void)
{
for (int16_t i=0; i<DISPLAY_HEIGHT; i+=2) {
display.drawCircle(DISPLAY_WIDTH/2, DISPLAY_HEIGHT/2, i);
display.display();
delay(10);
}
delay(1000);
display.clear();
display.drawCircleQuads(DISPLAY_WIDTH/2, DISPLAY_HEIGHT/2, DISPLAY_HEIGHT/4, 0b00000001);
display.display();
delay(200);
display.drawCircleQuads(DISPLAY_WIDTH/2, DISPLAY_HEIGHT/2, DISPLAY_HEIGHT/4, 0b00000011);
display.display();
delay(200);
display.drawCircleQuads(DISPLAY_WIDTH/2, DISPLAY_HEIGHT/2, DISPLAY_HEIGHT/4, 0b00000111);
display.display();
delay(200);
display.drawCircleQuads(DISPLAY_WIDTH/2, DISPLAY_HEIGHT/2, DISPLAY_HEIGHT/4, 0b00001111);
display.display();
}
void printBuffer(void)
{
display.setLogBuffer(5, 30);
const char* test[] = {
"Hello",
"World" ,
"----",
"Show off",
"how",
"the log buffer",
"is",
"working.",
"Even",
"scrolling is",
"working"
};
for (uint8_t i = 0; i < 11; i++) {
display.clear();
display.println(test[i]);
display.drawLogBuffer(0, 0);
display.display();
delay(500);
}
}
void setup()
{
display.init();
display.setContrast(255);
drawLines();
delay(1000);
display.clear();
drawRect();
delay(1000);
display.clear();
fillRect();
delay(1000);
display.clear();
drawCircle();
delay(1000);
display.clear();
printBuffer();
delay(1000);
display.clear();
}
void loop() { }
*The program will do some acts of drawing, display some characters at the end, and then stop
- Function Declaration:
- Set contrast
setContrast(contrast)
drawLines()
drawRect()
drawCircle()
printBuffer()
Clock
- Open DFRobot_OLED12864 Clock Demo
*Function:Switch between an analog dial frame and a digital clock frame every 5 seconds.
- Function Declaration:
- Create an UI object and specify its OLED object
OLEDDisplayUi ui ( &display ):
setTargetFPS(fps)
- Set active screen identification
setActiveSymbol(activeSymbol)
- Set inactive screen identification
setInactiveSymbol(inactiveSymbol)
- Set the position of the indicator
setIndicatorPosition(pos)
- Set the direction of indicator
setIndicatorDirection(direction)
- Set the slide direction of the frame
setFrameAnimation(direction)
setFrames(frames, count)
setOverlays(overlays, count)
setTime(time)
update()
- Set the time to automatically Update the Screen(the unit is ms)
setTimePerFrame(time)
- Allow automatic scrolling
enableAutoTransition()
- Prohibit automatic scrolling
disableAutoTransition()
- Set the content of display
transitionToFrame(frame)
Progress Bar
- Function: Display the progress bar on the screen
- Function Declaration:
- Draw progress bar
drawProgressBar(x, y, width, height, progress)
setTextAlignment(alignment)
- Draw string in specified location
drawString(x, y, string)
UI
- Open DFRobot_OLED12864 UI Demo
#include "DFRobot_OLED12864.h"
#include "OLEDDisplayUi.h"
#include "images.h"
DFRobot_OLED12864 display(0x3c);
OLEDDisplayUi ui(&display);
void msOverlay(OLEDDisplay *display, OLEDDisplayUiState* state)
{
display->setTextAlignment(TEXT_ALIGN_RIGHT);
display->setFont(ArialMT_Plain_10);
display->drawString(128, 0, String(millis()));
}
void drawFrame1(OLEDDisplay *display, OLEDDisplayUiState* state, int16_t x, int16_t y)
{
display->drawXbm(x + 34, y + 14, WiFi_Logo_width, WiFi_Logo_height, WiFi_Logo_bits);
}
void drawFrame2(OLEDDisplay *display, OLEDDisplayUiState* state, int16_t x, int16_t y)
{
display->setTextAlignment(TEXT_ALIGN_LEFT);
display->setFont(ArialMT_Plain_10);
display->drawString(0 + x, 10 + y, "Arial 10");
display->setFont(ArialMT_Plain_16);
display->drawString(0 + x, 20 + y, "Arial 16");
display->setFont(ArialMT_Plain_24);
display->drawString(0 + x, 34 + y, "Arial 24");
}
void drawFrame3(OLEDDisplay *display, OLEDDisplayUiState* state, int16_t x, int16_t y)
{
display->setFont(ArialMT_Plain_10);
display->setTextAlignment(TEXT_ALIGN_LEFT);
display->drawString(0 + x, 11 + y, "Left aligned (0,10)");
display->setTextAlignment(TEXT_ALIGN_CENTER);
display->drawString(64 + x, 22 + y, "Center aligned (64,22)");
display->setTextAlignment(TEXT_ALIGN_RIGHT);
display->drawString(128 + x, 33 + y, "Right aligned (128,33)");
}
void drawFrame4(OLEDDisplay *display, OLEDDisplayUiState* state, int16_t x, int16_t y)
{
display->setTextAlignment(TEXT_ALIGN_LEFT);
display->setFont(ArialMT_Plain_10);
display->drawStringMaxWidth(0 + x, 10 + y, 128, "Lorem ipsum\n dolor sit amet, consetetur sadipscing elitr, sed diam nonumy eirmod tempor invidunt ut labore.");
}
void drawFrame5(OLEDDisplay *display, OLEDDisplayUiState* state, int16_t x, int16_t y)
{
}
FrameCallback frames[] = { drawFrame1, drawFrame2, drawFrame3, drawFrame4, drawFrame5 };
int frameCount = 5;
OverlayCallback overlays[] = { msOverlay };
int overlaysCount = 1;
void setup()
{
Serial.begin(115200);
Serial.println();
Serial.println();
ui.setTargetFPS(60);
ui.setActiveSymbol(activeSymbol);
ui.setInactiveSymbol(inactiveSymbol);
ui.setIndicatorPosition(BOTTOM);
ui.setIndicatorDirection(LEFT_RIGHT);
ui.setFrameAnimation(SLIDE_LEFT);
ui.setFrames(frames, frameCount);
ui.setOverlays(overlays, overlaysCount);
ui.init();
display.flipScreenVertically();
}
void loop()
{
int remainingTimeBudget = ui.update();
if (remainingTimeBudget > 0) {
delay(remainingTimeBudget);
}
}
*Function: Switch between 5 frames
- Function declaration:
- User can edit the frame
drawFrame5(*display, *state, x, y)
Dimension
- Pin Spacing: 2.54mm/0.1in
- Mounting hole spacing: 24mm/53mm 0.94/2.09in
- Mounting hole size: 3.1mm/0.12in
- Board Size: 29.00mm×58.00mm/1.14x2.28in
- Thickness:1.6mm/0.06in

FAQ
For any questions, advice or cool ideas to share, please visit the DFRobot Forum.
More Documents
FAQ
For any questions, advice or cool ideas to share, please visit the DFRobot Forum.