ESP32 Espruino Tutorial: Adding properties to previously created object
Introduction
In this esp32 tutorial we will check how to add properties to a previously created object using Espruino on the ESP32.
Recall that Espruino is a JavaScript interpreter, so we can use many of the language features on our ESP32.
As mentioned in previous posts, JavaScript is a very flexible and dynamic language. Thus, adding properties to an object after its creation is something really simple, as we will see in the code below.
The tests were performed using a DFRobot’s ESP32 module integrated in a ESP32 development board.
The code
We will start by creating a very simple object, with just one property. We will call the property “objCreateProp“.
var myObj = {objCreatedProp : "Original prop"};
We will print the object to the console for later comparing with the final result.
console.log(myObj);
Now, to add a new property to our previously created object, we simply use the name of the object followed by square brackets and inside we put the name of our new property, as a string. We will call the new property “addedProp“. Then, we simply assign this new property a value using the assignment operator “=“.
We will print the object to confirm the new property was added.
myObj["addedProp"] = "Added prop";
console.log(myObj);
Alternatively, we can use the dot operator to add a new property to the object. So, we use the name of the object, followed by the dot operator, followed by the name of the new property, which we will call “addedProp2“. Again, we use the assignment operator “=” to assign a value to this new property.
myObj.addedProp2 = "Another Added Prop";
console.log(myObj);
Now we can simply access these new properties using the regular JavaScript property accessors, namely the square bracket and the dot notation. Note the similarity between the notation for accessing an object’s properties to read their values, to change their values and to add new properties to an object.
console.log(myObj.addedProp);
console.log(myObj["addedProp"]);

console.log(myObj.addedProp2);
console.log(myObj["addedProp2"]);
The full code for this script can be seen below.
var myObj = {objCreatedProp : "Original prop"};
console.log(myObj);

myObj["addedProp"] = "Added prop";
console.log(myObj);

myObj.addedProp2 = "Another Added Prop";
console.log(myObj);

console.log(myObj.addedProp);
console.log(myObj["addedProp"]);

console.log(myObj.addedProp2);
console.log(myObj["addedProp2"]);
Testing the code
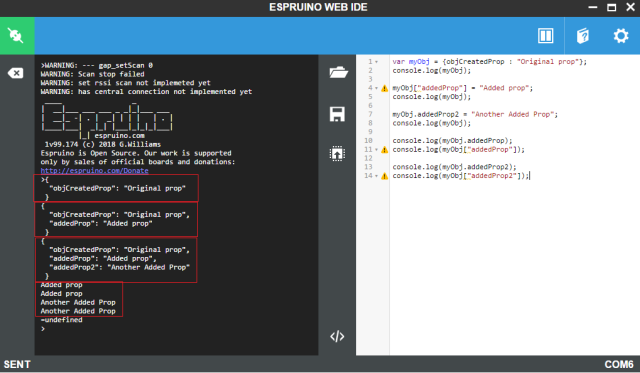
To test the code, simply run it on the Espruino IDE. You should get an output similar to figure 1, which shows the new properties were indeed added to the object, as expected.

Figure 1 – Adding properties to already created object.


