ESP32 / ESP8266 Arduino Tutorial:3. using the TRACE macro
Introduction
In this tutorial we will learn how to use the TRACE macro of the ArduinoTrace library to help debugging our programs.
This library can be downloaded from the Arduino IDE library manager, as explained in more detail in this introductory tutorial.
TRACE is a parameterless macro that prints the following information about the function from where it is called [1]:
- Filename
- Line number
- Function’s name
- Function’s parameters
- Template parameters (if any)
So, in this tutorial, we will test the use of the TRACE macro inside a function we will define, and check what is outputted to the serial port.
The tests on the ESP32 were performed using a DFRobot’s ESP-WROOM-32 device integrated in a ESP32 FireBeetle board. The tests on the ESP8266 were performed on a DFRobot’s ESP8266 FireBeetle board.
The code
We will start by including ArduinoTrace.h library, so we can have access to the TRACE macro in our code. You can check here the header file for the library.
#include "ArduinoTrace.h"
Next we will declare a function that receives as input a int parameter, so we can later confirm that the function parameters are printed when the TRACE macro is called. Nonetheless this will be a dummy parameter that we are not going to use inside the function.
In the body of the function we will simply call the TRACE macro.
void myFunction(int x){
  TRACE();
}
Moving on to the Arduino setup function, we will first open a serial connection, so the information provided by the macro can be outputted.
Serial.begin(115200);
Next we will also call the TRACE macro inside the setup function, to compare the results when testing the code.
TRACE();
Finally, we will call our previously defined function, passing as input an arbitrary integer. Its value doesn’t matter because, as already mentioned, it won’t be used inside the function.
myFunction(10);
The final source code can be seen below. Note that the first call to the TRACE macro is done in line 4, inside our function. The second call is done in line 11, inside the Arduino setup function.
#include "ArduinoTrace.h"

void myFunction(int x){
  TRACE();
}

void setup() {

  Serial.begin(115200);

  TRACE();

  myFunction(10);
}

void loop() {}
Testing the code
To test the code, simply compile it and upload it to your device using the Arduino IDE. Next, when the uploading procedure finishes, open the serial monitor.
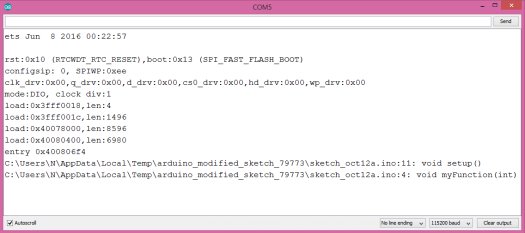
You should get an output similar to figure 1. As can be seen, for both calls of the TRACE macro, the name of the file is printed. Since we are using a single file to develop our code, both have the same value, but in a scenario where we divide our code in multiple files this becomes very useful.
For the first call, which is performed in the Arduino setup, the correct line is printed: line 11. Note also that the full function prototype of the setup function is also printed, as expected.
For the second call of the TRACE macro, the correct line is also printed: line 4. Also, like before, the function signature is printed, which includes the int parameter that it receives.

Figure 1 – Output of the program with the calls to the TRACE macro.


