TUTORIALS ESP32 The objective of this post is to explain how to perform base64 encoding on strings, using the Arduino core running on the ESP32. The tests of this ESP32 tutorial were performed using a DFRobot’s ESP-WROOM-32 device integrated in a ESP32 FireBeetle board.
ESP32 Arduino: Base64 enconding
DFRobot
Dec 26 2017 261530
The objective of this post is to explain how to perform base64 encoding on strings, using the Arduino core running on the ESP32. The tests of this ESP32 tutorial were performed using a DFRobot’s ESP-WROOM-32 device integrated in a ESP32 FireBeetle board.
Introduction
The objective of this esp32 tutorial is to explain how to perform base64 encoding on strings, using the Arduino core running on the ESP32.
Important: At the time of writing, there is a bug on the base64 encoding library that resets the ESP32 on certain strings. You can track the bug on GitHub here.
The tests of this ESP32 tutorial were performed using a DFRobot’s ESP-WROOM-32 device integrated in a ESP32 FireBeetle board.
If you prefer, you can check the video tutorial on my YouTube channel:
The code
In order for us to be able to use the base64 functionalities available in the Arduino core, we need to first include the base64.h library.
#include <base64.h>
Moving to the setup function, we will start by opening a Serial connection, to output the results of applying the base64 encoding.
Serial.begin(115200);
Next we will declare an arbitrary string to be used in the encoding.
String toEncode = "Test encoding";
In order to apply the base64 encoding to the previously declared string, we simply need to call the encode method of the base64 class. This method receives as input the string we want to encode and returns the base64 encoded result, also as a string.
Note however that the encode method is a static method. Thus, we don’t need to create an object of the base64 class to use it. So, we can simply use the class name and the C++ scope resolution operator (::) to access this static method.
String encoded = base64::encode(toEncode);
Finally, we will print the result to the Serial port, so we can analyse it upon running the code. You can check the final code below, which already includes this print.
#include <base64.h>

void setup() {
  Serial.begin(115200);

  String toEncode = "Test encoding";

  String encoded = base64::encode(toEncode);

  Serial.println(encoded);
}

void loop() {}
Testing the code
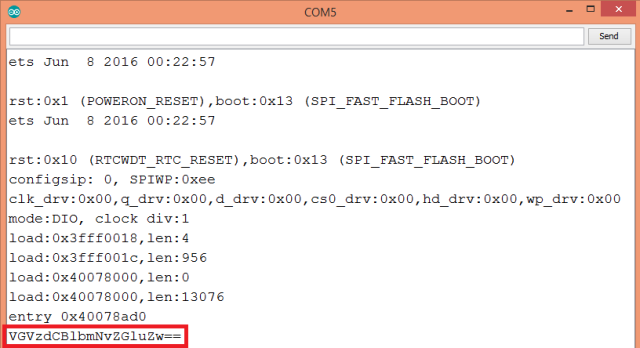
To test the code, simply compile it and upload it to your ESP32 using the Arduino IDE. After the procedure finishes, open the IDE Serial Monitor. You should get an output similar to the one shown in figure 1, which has the base64 encoded result.

Figure 1 – Output of the base64 encoding.
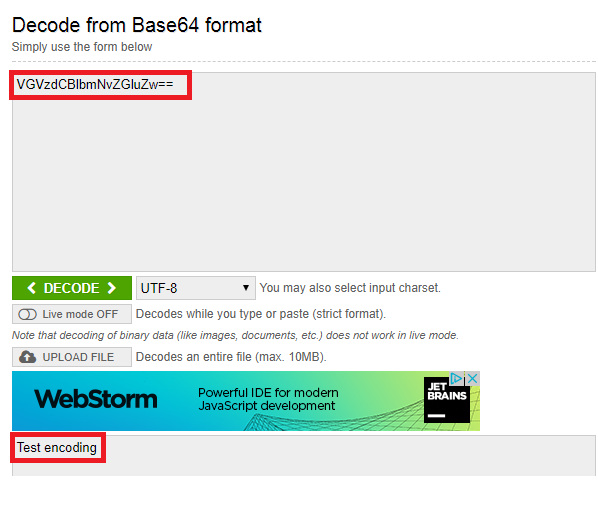
We can confirm that the result is correct by decoding the output of our program on this online tool. You should get the original string, as shown in figure 2.


