DFRobot US Warehouse is OPEN! 130+ Popular Items with Zero Import Fees. Learn More >>
ESP32 Arduino Tutorial 26. FAT file system: Reading a file
Introduction
In this tutorial we will check how to read a file from the ESP32 FAT file system, using the Arduino core.
For an introductory tutorial on how to use the FAT file system on the ESP32 and on the procedure that we need to execute before using it, please check here.
In this tutorial we will first write a file and only then read it, in order to guarantee that the file exists. For a detailed tutorial on how to write a file to the FAT file system, please check here. If you have already written a file in the file system, you can skip this part and go to the reading procedure.
It’s important to mention the big similarity that exists between the procedure of reading a file from the FAT file system and the procedure of reading a file from the SPIFFS file system. As can be seen here, the only difference is the library include and the extern variable that we use to interact with the specific file system.
The tests were performed using a DFRobot’s ESP32 module integrated in a ESP32 development board.
If you prefer a video version of this tutorial, please check my YouTube channel below.
The code
We will start by including the FFat.h library, so we can have access to the FFat extern variable, which we will use to interact with the file system.
#include "FFat.h"
Moving on to the setup function, we will start by opening a Serial connection, so we can output the results of our program.
Serial.begin(115200);
After that, we will mount the FAT file system, which is a procedure that we must do before interacting with it. Recall from the previous tutorial that we mount the file system by calling the begin method on the FFat extern variable.
Additionally, we can pass as input of the begin method a Boolean value indicating if the file system should be automatically formatted in case mounting fails. We are passing the value true so the formatting procedure is executed in case mounting fails.
if(!FFat.begin(true)){
     Serial.println("An Error has occurred while mounting FFat");
     return;
}
After that, we will write some content to a file called “/test.txt” so we can later read its content. Note that if you have already written a file in your file system, you can skip this part and simply read it.
For a detailed tutorial on how to write a file in the FAT file system, please check here. In short, in order to write content to the file, we first need to open it by calling the open method of the FFat extern variable, passing as first input the name of the file and as second the opening mode (in our case, the writing mode will be writing, so we should use the constant FILE_WRITE).
As output, we will receive an object of class File. We will first confirm that the file was successfully opened for writing and then we will write a testing string by calling the print method on the File object.
This method receives as input the string with the content to be written and returns as output the number of bytes written to the file, which we will use for error checking.
Finally, we will call the close method on our File object, in order to free the resources.
File file = FFat.open("/test.txt", FILE_WRITE);

if(!file){
    Serial.println("There was an error opening the file for writing");
    return;
}

if(file.print("TEST FAT FS")){
    Serial.println("File was written");;
} else {
    Serial.println("File write failed");
}

file.close();
Now we will take care of the reading procedure. Once again, we need to open the file, but this time in reading mode.
As before, we use the open method of the FFat extern variable. Nonetheless, we can pass only the first argument with the name of the file to open and omit the opening mode argument, since it defaults to reading mode.
As before, we will check if the file was correctly opened before we interact with it.
File file2 = FFat.open("/test.txt");

if(!file2){
    Serial.println("Failed to open file for reading");
    return;
}
To read the file, we can leverage the available method of the File object, which returns as output the number of bytes that are left to read. So, we can use the output of this method as stopping condition for a reading loop.
Inside the loop, we will read the content byte by byte by calling the read method of the file object. This method takes no arguments and returns as output the next byte of the file, which we will directly write to the serial port.
Serial.println("File Content:");

while(file2.available()){

    Serial.write(file2.read());
}
Finally, after reading all the content, we should close the file by calling the close method on our File object.
file2.close();
The final complete source code can be seen below.
#include "FFat.h"

void setup() {

   Serial.begin(115200);

   if(!FFat.begin(true)){
        Serial.println("An Error has occurred while mounting FFat");
        return;
   }

    File file = FFat.open("/test.txt", FILE_WRITE);

    if(!file){
        Serial.println("There was an error opening the file for writing");
        return;
    }

    if(file.print("TEST FAT FS")){
        Serial.println("File was written");;
    } else {
        Serial.println("File write failed");
    }

    file.close();

    File file2 = FFat.open("/test.txt");

    if(!file2){
        Serial.println("Failed to open file for reading");
        return;
    }

    Serial.println("File Content:");

    while(file2.available()){

        Serial.write(file2.read());
    }

    file2.close();
}

void loop() {}
Testing the code
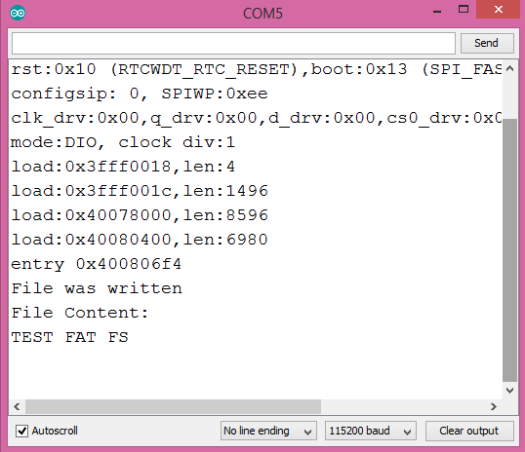
To test the code, simply compile it and upload it to your ESP32. When the procedure finishes, open the Arduino IDE serial monitor. You should have an output similar to figure 1, which shows the content previously written to the file being printed.

Figure 1 – Output of the program.


