How To Build An Automatic Navigation Robot ( Based On The HCR Robotic Platform) : Lesson 1
How to locate robot real-timely and precisely?
How to circumvent environmental barriers and reach destination effectively?
How to effectively plan the shortest route between two places in unknown environment?
With corresponding solutions, service robot manufacturers also need to consider how to quickly integrate with the existing systems and speed up the listing of products?
How to balance between high performance and low cost?
One solution for solving six problems, SLAMWARE system is enough.
SLAMWARE system consists of high-performance RPLIDAR and positioning control engine SLAMWARE Core.

SLAMWARE is directly connected with RPLIDAR, and connected with chassis through Control Bus. High Speed Bus is a high-speed 100M Ethernet, responsible for connection with human-computer interaction system, and for transmitting map data.
Meanwhile, SLAMWARE Core also support data from ultrasonic sensor, anti-drop sensor, collision sensor and deep camera, and integrate them with that of lidar. Relying on information integration, robot could realize intelligent and practical automatic movement.
Are you fed up with boring instructions and product pictures and thinking of some practical cases?Now, here is one case.
This is HCR - Mobile Robot Platform with Sensors and Microcontroller launched by DFrobot. This is a two-wheel-drive HCR robotic platform. There is a buphthalmus caster at the front of chassis, which is equipped with collision sensor and can be used as emergency brake trigger.As an open source robotic platform for education, research and enthusiasts, HCR robot has many sensor interfaces, convenient for users to quickly build prototypes and verify design ideas.

Today I will show you how to build Slamware automatic navigation system based on HCR robotic platform.
Steps:
1. System composition
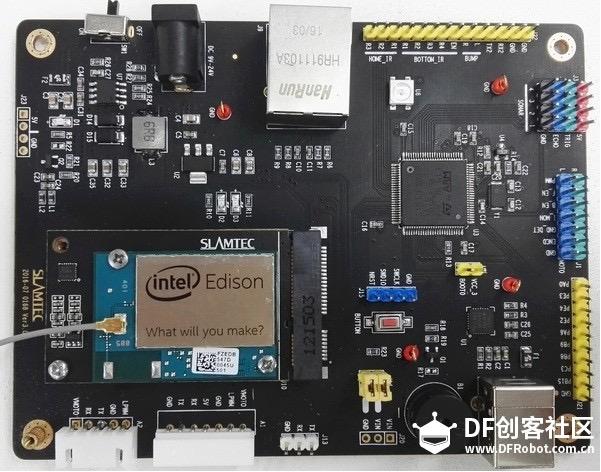
(1)Slamware breakout V3.0

(2)RPLIDAR A2 - 360 Degree Laser Scanner Development Kit

(3)HCR - Mobile Robot Platform with Sensors and Microcontroller
(4) Ultrasonic sensor*3
(5) Motor drive
(6) High current lithium polymer battery
(7)DuPont lines, a VCC, GND expansion panel (homemade)
2. Structure diagram

3.Hardware platform construction
(1)Build HCR platform (including left and right motors, collision sensors, and ultrasonic sensors). You only need to set up the two bottom layers on HCR platform.
(2)Fix Slamware breakout V3, motor drive panel, RPLIDAR A2 (wiring direction is the advancing direction of robot and make sure you don’t install in the opposite direction), lithium battery (fixed on the bottom layer of chassis), and 5V power supply/GND expansion panel (on the left of the following picture), as shown below:

(3)Wiring
a. RPLIDAR: insert RPLIDAR A2 into A2 socket on the board according to the said structure diagram.
b. Sonar: support 8 ultrasonic sensors at most (installing three sensors on the left, middle and right for the experiment). Insert them into the Sonar sockets 1, 2, and 3 at position J3 on the board, respectively. Ultrasonic sensor has four pins, GND, Trig, ECHO, and VCC. Connect them with the four corresponding pins on the board.
c. Bumper: support 8 collision sensors at most (also installing three sensors on the left, middle and right for the experiment). The three pins of collision sensor are VCC, DATA, and GND. Now, there are only two Bumper data interfaces, left and right, in area J22 on V3 board. We can connect the data pin of mid Bumper with GPIO.
Here is how I connect:
| Data | GND | VCC | |
| Left Bumper | J22/L | Expansion Shield GND | Expansion Shield VCC |
| Mid Bumper | J21/ PB8 | Expansion Shield GND | Expansion Shield VCC |
| Right Bumper | J22/R | Expansion Shield GND | Expansion Shield VCC |
d. Motor drive panel/left and right motors
| Black Motor+ | Red Motor+ | Yellow VCC | Green GND | Blue A | Orange B | |
| Left | Motor Driver M2- | Motor Driver M2+ | Expansion Board VCC | Expansion Board GNC | / | Slamware V3/J1/L/ENCD |
| Right | Motor Driver M1- | Motor Driver M1+ | Expansion Board VCC | Expansion Board GNC | / | Slamware V3/J1/R/ENCD |
| Motor Driver Pin3 | Slamware V3/J1/R/ENCD |
| Motor Driver Pin11 | Slamware V3/J1/L/ENCD |
| Motor Driver Pin4 | Slamware V3/J1/R/ENCD |
| Motor Driver Pin12 | Slamware V3/J1/L/ENCD |
| PWR | Battery |
After completing hardware platform construction, we are not far away from completing automatic navigation HCR platform. Next time, we will continue to introduce firmware code configuration. Please follow closely~
You could check robot kits to find more.


