TUTORIALS Arduino Do you dare to open Pandora’s box?
COMPONENTS
1× Analog Ambient Light Sensor V2
HARDWARE CONNECTIONS
CODE INPUT
If you have any questions, please feel free to comment.
Arduino Intermediate Kit Tutorial 14: Pandora’s Box
DFRobot
Sep 01 2017 3801
Do you dare to open Pandora’s box?
The box we will make today will be closed during the daytime, but when night comes it will gradually open and the light inside will gradually glow bright.
An analog ambient light sensor is used to detect the intensity of light outside the box. When the value reaches the limit for the night, the servo will move, opening the box and an inner-led will glow brighter.
COMPONENTS
1× Analog Ambient Light Sensor V2
1× TowerPro SG50 Servo
1× Digital Piranha LED-R
1× DFRduion UNO R3 (similar as Arduino UNO)
1× IO Expansion Shield for Arduino V7.1
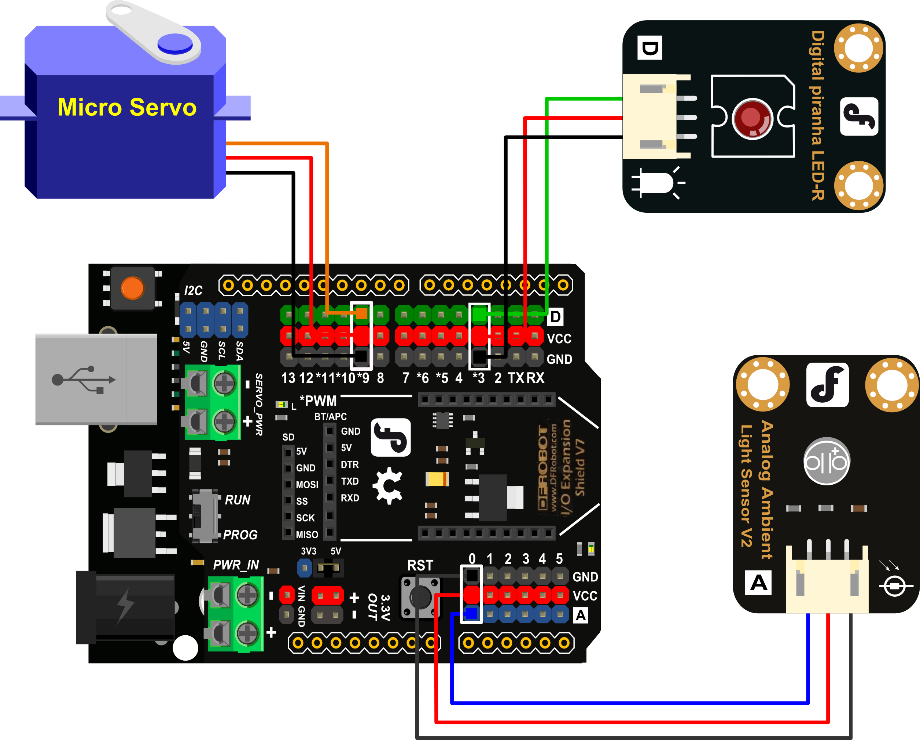
HARDWARE CONNECTIONS
Connect the TowerPro SG50 Servo to digital pin 9 on the DFRduino
Connect the Analog Ambient Light Sensor V2 to analog pin 0 on the DFRduinio
Connect the Digital Piranha LED-R to digital pin 3 on the DFRduino
You can refer to the diagram below for reference:
Be sure that your power, ground and signal corrections are correct or you risk damaging your components.
When you have connected the components and checked your connections, plug the Arduino in to your PC with the USB cable so you can upload a program to the DFRduino.
CODE INPUT
Sample Code 11-1:
#include <Servo.h> Servo myservo; int LED = 3; //Set the LED light to be digital pin 3 int val = 0; // val stores analog ambient light sensor’s value int pos = 0; int light =0; void setup(){ pinMode(LED,OUTPUT); // LED is set to be in the output mode Serial.begin(9600); //Baud rate of the serial port is set to be 9600 myservo.attach(9); // attach the servo to digital pin 9 myservo.write(0); // initial angle is 0 } void loop(){ val = analogRead(0); //read the analog ambient light sensor’s value Serial.println(val); //Check sensor value in serial port if(val<40){ // when val is less than the pre-set value, increase the angle pos = pos +2; if(pos >= 90){ //The angle should not be more than 90 pos = 90; } myservo.write(pos); //write angle of the servo delay(100); light = map(pos,0,90,0,255); //As the angle expands, the LED becomes brighter analogWrite(LED,light); //write the brightness value }else{ pos = pos -2; //decrease 2° if(pos <= 0){ pos = 0; //until 0° } myservo.write(pos); //write angle of the servo delay(100); light = map(pos,0,90,0,255);//As the angle shrinks, the LED light becomes darker analogWrite(LED,light); //write the brightness value } }
Use this sample code to implement the behavior we want.
You can copy and paste it in to the Arduino IDE, but if you want to develop you skills we recommend typing it out.
When you have finished, click “Verify” to check the code for syntax errors. If the code verifies successfully, you can upload it to your Arduino.
Attach the servo on to the hinge of the box so that the arm is able to open it. The ambient light sensor needs to be placed outside the box to detect the ambient lighting. The LED is placed inside the box.
Place the box somewhere dark and check if it opens automatically.
If you have questions about the functions in the sample code, please refer to the previous sessions for details.
If you have any questions, please feel free to comment.
There is also another best selling arduino starter kit for you to choose.
Related category: arduino kits > education kits
Last Arduino Tutorial: Arduino Intermediate Kit Tutorial 13: Open Sesame!
Next Arduino Tutorial: Arduino Intermediate Kit Tutorial 15: Remote Controlled LED
Related Product

Recent Blogs

Meet DFRobot at Bett 2025: Experience AI & Robotics Live
Join us at Booth ND32 to explore cutting-edge AI, IoT, and STEM tools like UNIHIKER K10 and Maqueen Plus V3.
NEWS Jan 20 2025

Selection Guide for DFRobot pH Sensors
DFRobot provides pH sensors for Arduino hobbyists to industrial use. Explore our detailed comparison to find the perfect sensor for your needs.
SELECTION GUIDE Jan 13 2025

How Soil Moisture Sensors Work in Home Gardening and Agricultural Irrigation
If you're looking to understand how soil humidity sensors function, this article covers the essential principles behind different types of soil sensors and their applications in gardening and agricultural irrigation.
SELECTION GUIDE Jan 12 2025