TUTORIALS LattePanda Hardware components:
Software apps and online services:
Your phone is smart enough to adjust the screen brightness automatically. But most of the computers don't have this sweet function. In order to make my computer more humanized, I write an easy demo to realize this function. Hope you like it! If you have any questions, please let me know:-)
Hardware list:
Software list:
Step 2: Simple Demo
Step 5: Simple Demo
Step 13: Solution
Step 14: End
LattePanda Tutorial: Control the Screen Brightness Automatically
DFRobot
Apr 03 2018 260455
This lattepanda tutorial shows you how to control the screen brightness automatically. I use the LattePanda as a PC. Hope you like it.
Hardware components:
Arduino Leonardo
Analog Ambient Light Sensor TEMT6000
LattePanda 2GB/32GB (Unactivated)
Software apps and online services:
Microsoft Visual Studio 2015
Arduino IDE
STORY
Your phone is smart enough to adjust the screen brightness automatically. But most of the computers don't have this sweet function. In order to make my computer more humanized, I write an easy demo to realize this function. Hope you like it! If you have any questions, please let me know:-)
Step 1: What You Need
Hardware list:
Ambient light sensor
Lattepanda
Software list:
Visual Studio
Arduino IDE
Note:LattePanda is a low cost regular Windows computer, it also includes an Arduino co-processor, which means it can be used to control and sense the physical world when you add sensors and actuators.If you don't have the LattePanda, you can plug in Leonardo to your computer instead.
Step 2: Simple Demo
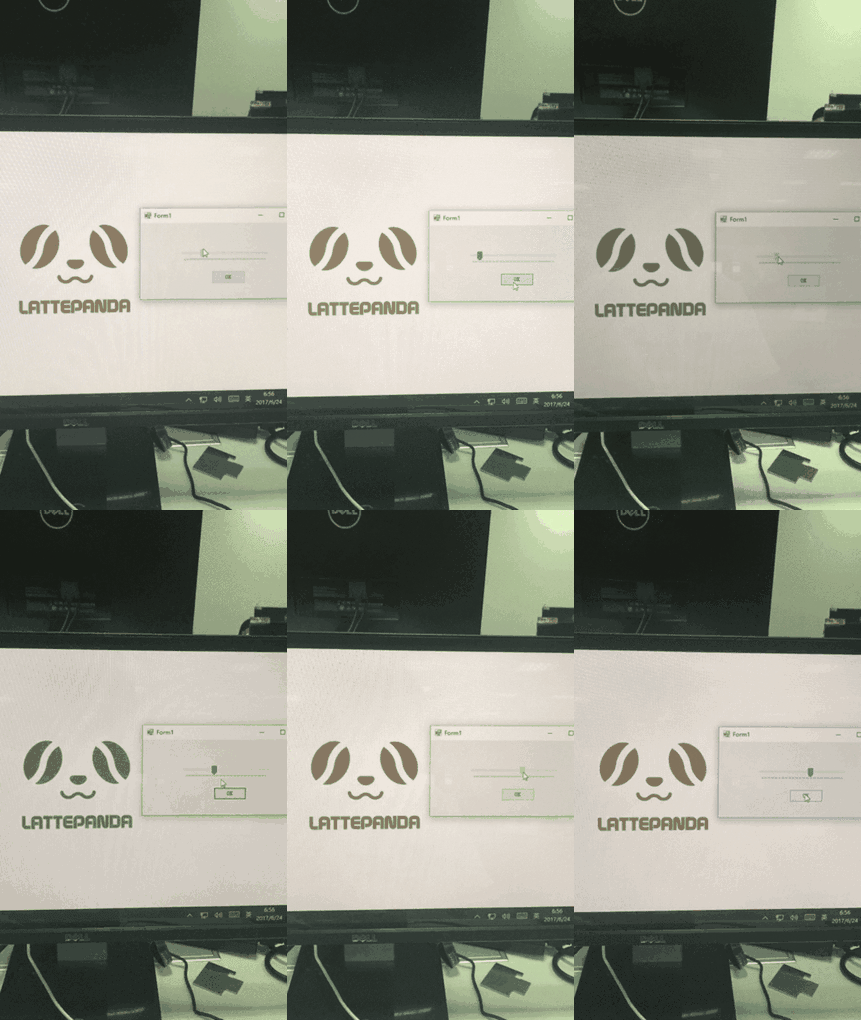
First of all, let's try to use an easy way to change the screen brightness like the gif picture show above. You just need to use your computer.
Step 3: Simple Demo
Open the Visual Studio and create a new Windows Forms Application.
Step 4: Simple Demo

In 'ToolBox' dialog, drag the 'Button' and 'Trackbar' to the form.
Step 5: Simple Demo
Copy the following code.Start.Drag the bar and press the button.See what will happen.
using System;
using System.Collections.Generic;
using System.ComponentModel;
using System.Data;
using System.Drawing;
using System.Linq;
using System.Text;
using System.Threading.Tasks;
using System.Windows.Forms;
using System.Runtime.InteropServices;
namespace brightnesscontrol
{
   public partial class Form1 : Form
   {
       [DllImport("gdi32.dll")]
       private unsafe static extern bool SetDeviceGammaRamp(Int32 hdc, void* ramp);
       private static bool initialized = false;
       private static Int32 hdc;
       private static int a;
       public Form1()
       {
           InitializeComponent();
       }
       private static void InitializeClass()
       {
           if (initialized)
               return;
           //Get the hardware device context of the screen, we can do
           //this by getting the graphics object of null (IntPtr.Zero)
           //then getting the HDC and converting that to an Int32.
           hdc = Graphics.FromHwnd(IntPtr.Zero).GetHdc().ToInt32();
           initialized = true;
       }
       public static unsafe bool SetBrightness(int brightness)
       {
           InitializeClass();
           if (brightness > 255)
               brightness = 255;
           if (brightness < 0)
               brightness = 0;
           short* gArray = stackalloc short[3 * 256];
           short* idx = gArray;
           for (int j = 0; j < 3; j++)
           {
               for (int i = 0; i < 256; i++)
               {
                   int arrayVal = i * (brightness + 128);
                   if (arrayVal > 65535)
                       arrayVal = 65535;
                   *idx = (short)arrayVal;
                   idx++;
               }
           }
           //For some reason, this always returns false?
           bool retVal = SetDeviceGammaRamp(hdc, gArray);
           //Memory allocated through stackalloc is automatically free'd
           //by the CLR.
           return retVal;
       }
       private void trackBar1_Scroll(object sender, EventArgs e)
       {
       }
       private void button1_Click(object sender, EventArgs e)
       {
           a = trackBar1.Value;
           SetBrightness(a);
       }
   }
}
Step 6: Screen Brightness Auto Control Demo
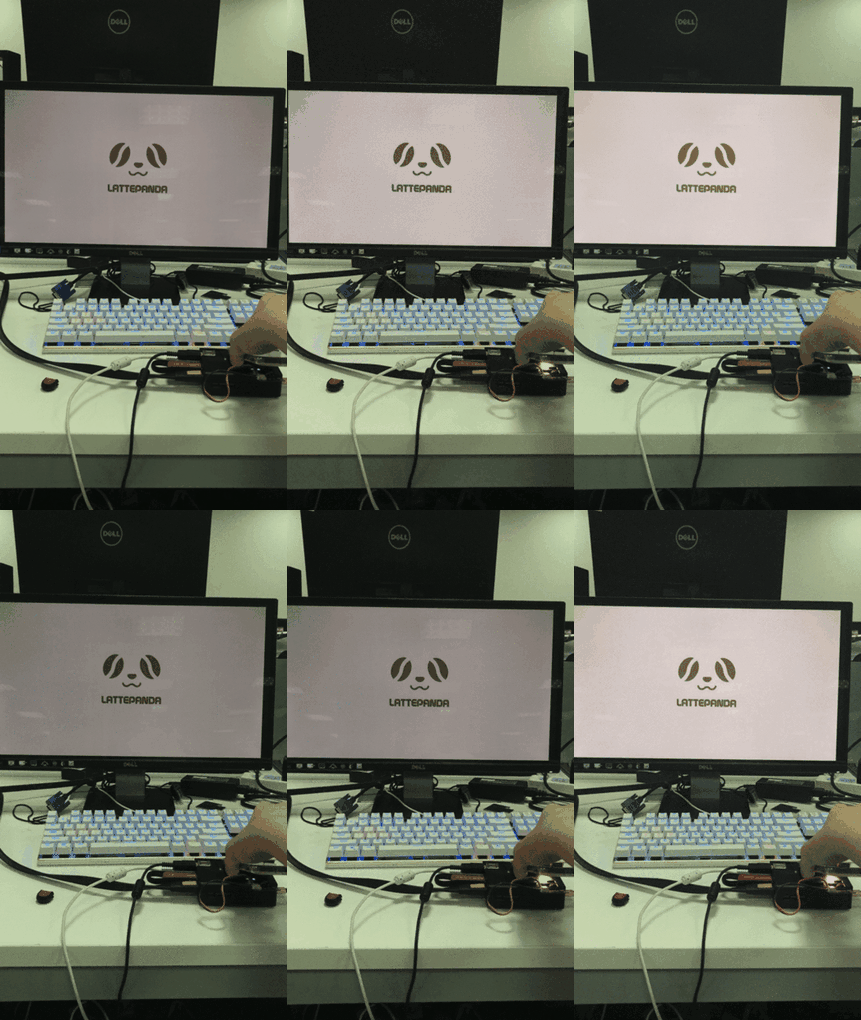
If you have the Lattepanda, that's perfect. If you don't, you can use Arduino UNO or Lenardo board and connect it to your computer.
Step 7: Screen Brightness Auto Control Demo
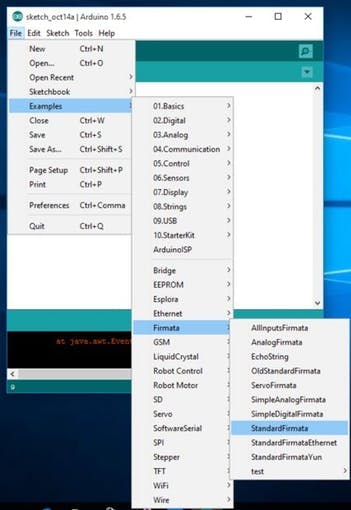
Open Arduino IDE and select the “StandardFirmata” ( File-Examples-firmata-StandardFirmata ).Upload the sketch.
Step 8: Screen Brightness Auto Control Demo
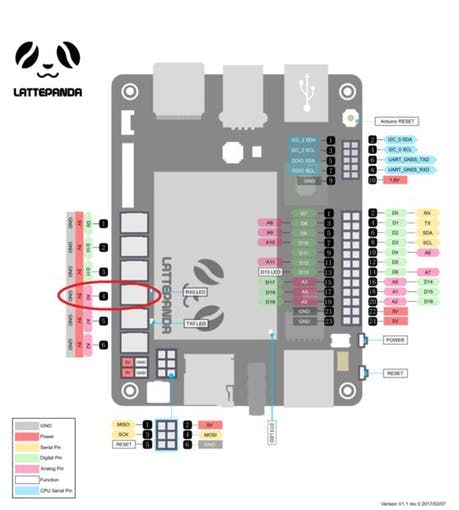
Connect the Ambient Light Sensor directly into pin A0.
Step 9: Screen Brightness Auto Control Demo
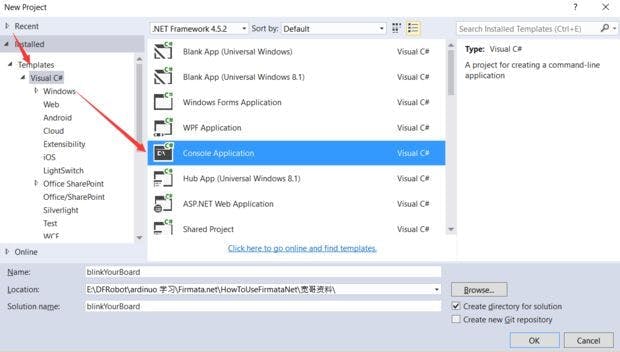
Open Visual Studio and create a new Console Application.
Step 10: Screen Brightness Auto Control Demo
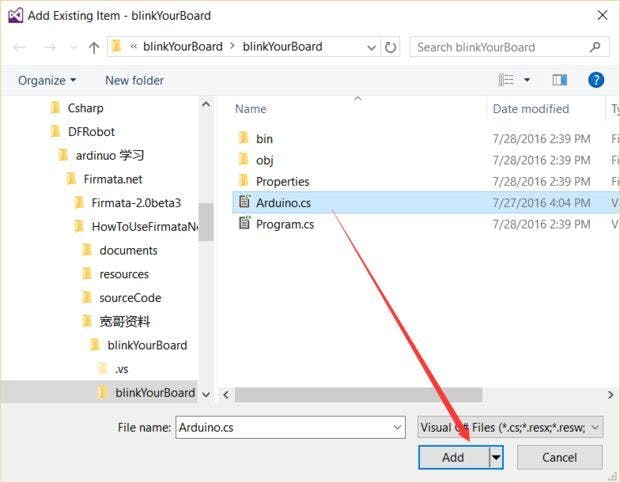
Download the LattePanda.Firmata class library.Add the downloaded class library to your project. Open your Solution Explorer and right-click in the blank area, then add existing item→select arduino.cs (Get more help here).
Step 11: Screen Brightness Auto Control Demo

Copy the following code, press Start.
using System;
using System.Collections.Generic;
using System.Linq;
using System.Text;
using System.Threading.Tasks;
using System.Threading;
using LattePanda.Firmata;
using System.Drawing;
using System.Runtime.InteropServices;
namespace screenbrightnessautocontrol
{
   class Program
   {
       [DllImport("gdi32.dll")]
       private unsafe static extern bool SetDeviceGammaRamp(Int32 hdc, void* ramp);
       private static bool initialized = false;
       private static Int32 hdc;
       private static int a;
       private static void InitializeClass()
       {
           if (initialized)
               return;
           //Get the hardware device context of the screen, we can do
           //this by getting the graphics object of null (IntPtr.Zero)
           //then getting the HDC and converting that to an Int32.
           hdc = Graphics.FromHwnd(IntPtr.Zero).GetHdc().ToInt32();
           initialized = false;
       }
       public static unsafe bool SetBrightness(int brightness)
       {
           InitializeClass();
           if (brightness > 255)
               brightness = 255;
           if (brightness < 0)
               brightness = 0;
           short* gArray = stackalloc short[3 * 256];
           short* idx = gArray;
           for (int j = 0; j < 3; j++)
           {
               for (int i = 0; i < 256; i++)
               {
                   int arrayVal = i * (brightness + 128);
                   if (arrayVal > 65535)
                       arrayVal = 65535;
                   *idx = (short)arrayVal;
                   idx++;
               }
           }
           //For some reason, this always returns false?
           bool retVal = SetDeviceGammaRamp(hdc, gArray);
           //Memory allocated through stackalloc is automatically free'd
           //by the CLR.
           return retVal;
       }
       static Arduino arduino = new Arduino();
       static void Main(string[] args)
       {
           arduino.pinMode(0, Arduino.PWM);
           SetBrightness(70);
           int flag1 = 0;
           int flag2 = 1;
           int flag3 = 0;
           int j;
           while (true)
           {
               int a=arduino.analogRead(0);
               Console.WriteLine(a);
               if (a >= 100)
               {
                   if (flag1 == 1)
                   {
                       for (j = 0; j <= 140; j+=4)
                       {
                           Console.WriteLine(j);
                           SetBrightness(j);
                       }
                   }
                   if(flag2==1)
                   {
                       for(j=70;j<=140;j+=4)
                       {
                           SetBrightness(j);
                           Console.WriteLine(j);
                       }
                   }
                   flag1 = 0;
                   flag2 = 0;
                   flag3 = 1;
               }
               if((a > 25)&& (a < 100))
               {
                   if (flag3 == 1)
                   {
                       for (j = 140; j >= 70; j-=4)
                       {
                           SetBrightness(j);
                           Console.WriteLine(j);
                           Thread.Sleep(1);
                       }
                   }
                   if(flag1==1)
                   {
                       for (j = 0; j <= 70; j+=4)
                       {
                           SetBrightness(j);
                           Console.WriteLine(j);
                       }
                   }
                   flag1 = 0;
                   flag2 = 1;
                   flag3 = 0;
               }
               if(a<25)
               {
                   if(flag2==1)
                   {
                       for(j=70;j>=0;j-=4)
                       {
                           SetBrightness(j);
                           Console.WriteLine(j);
                       }
                   }
                   if (flag3 == 1)
                   {
                       for (j = 140; j >= 0; j-=4)
                       {
                           SetBrightness(j);
                           Console.WriteLine(j);
                       }
                   }
                   flag1 = 1;
                   flag2 = 0;
                   flag3 = 0;
               }
               Thread.Sleep(1000);
           }
       }
   }
}
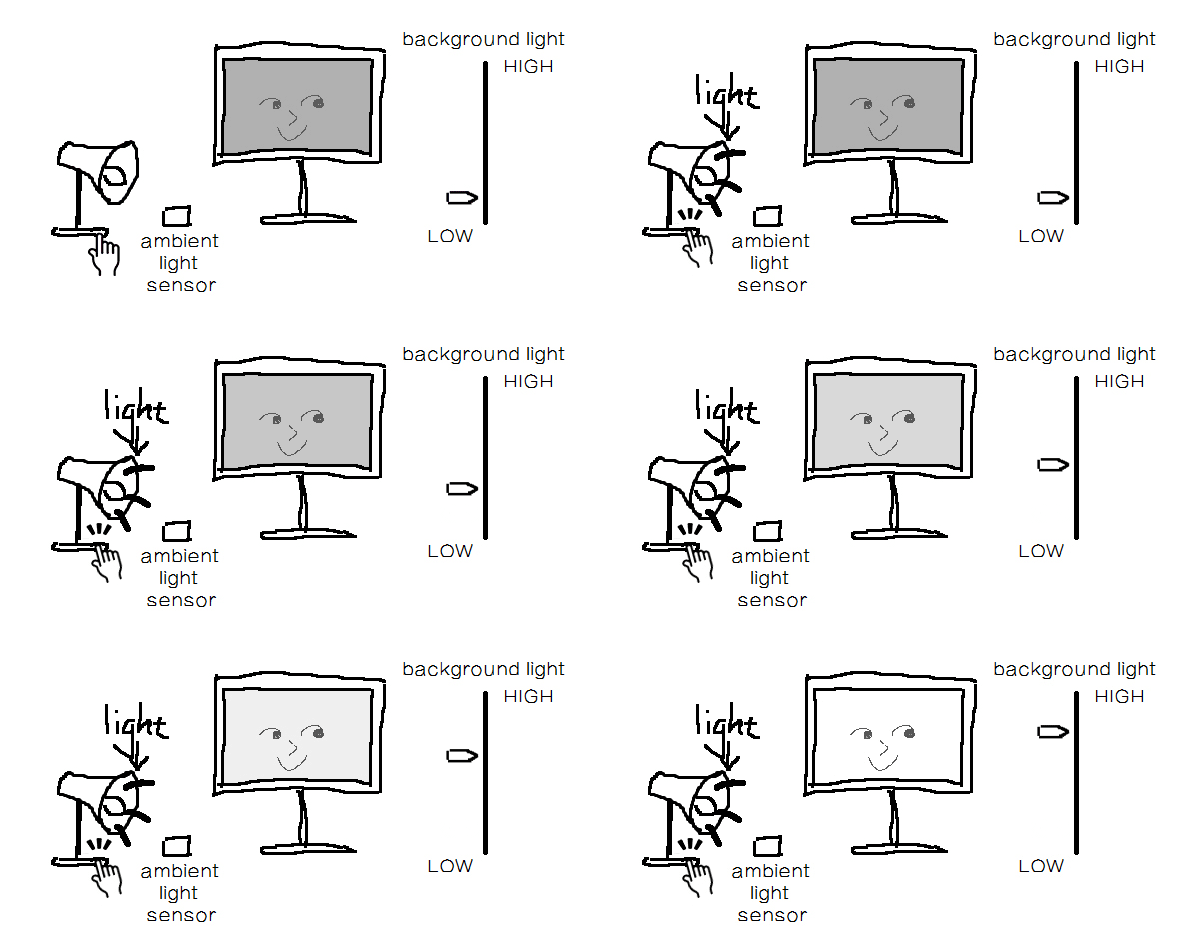
Try to shine your flashlight over the sensor and see what will happen. The screen brightness will change according to the light intensity. Every second, the computer will read the data from the sensor and then judge the light intensity. I set 3 levels of screen brightness in my code.The screen will become brighter when the light intensity is high.
Step 12: Problems You May Meet
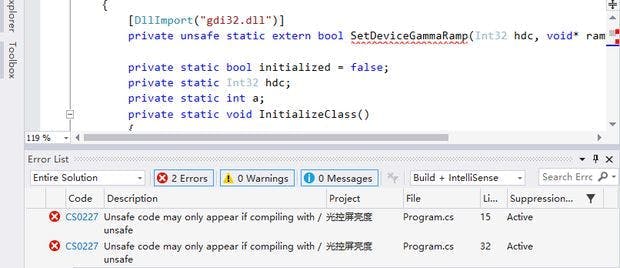
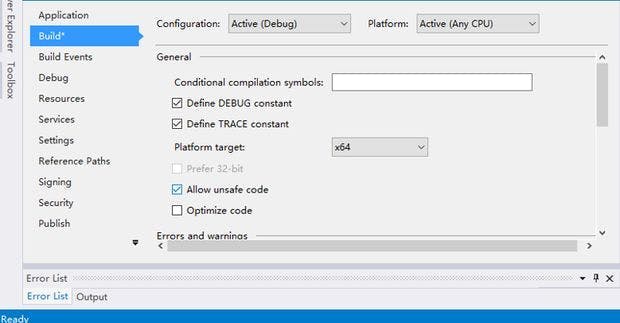
Step 13: Solution
