ESP32 / ESP8266 Arduino: Creating a simple class
The objective of this esp32 tutorial is to explain how to create a very simple class and instantiate an object of it in the Arduino core.
This code was tested on both the ESP32 and the ESP8266. The ESP32 tests were performed using a DFRobot’s ESP32 module device integrated in a ESP32 development board.
Introduction
The objective of this post is to explain how to create a very simple class and instantiate an object of it in the Arduino core.
Please note that this is just a simple tutorial on how to create a class, since object oriented programming (OOP) is a subject too broad to cover in just one post.
Nonetheless, learning OOP gives us a set of tools that will allow to write much cleaner and sophisticated code and its uses extend far beyond the scope of microcontrollers.
Furthermore, it allows us to be able to more easily analyse the source code of the many Arduino libraries out there, giving the possibility to understand what is happening under the hood and perform changes according to our needs.
Other important thing to mention is that the concepts we are covering here are from the C++ language, since Arduino is built on top of this language [1]. Besides that, although these tests were performed on ESP family devices, the code should work fine for any regular Arduino board.
This code was tested on both the ESP32 and the ESP8266. The tests were performed using a DFRobot’s ESP32 module device integrated in a ESP32 development board.
The code
Although it is a good practice to keep our classes in separate files and then import them where needed (pretty much like we do with Arduino libraries), we will declare ours in our main code file, for simplicity.
To declare our class, we use the class keyword followed by the name we want to call it. Then we enclose the class definition inside brackets. Note that as convention, classes are named with the first letter as uppercase.
class TestClass{
// Class definition
};
Our class will have two data members, which will be integers. We will initialize them with some arbitrary values, just for illustration purposes.
But before we declare these class data members, we need to take a look at the concept of visibility. Visibility allows us to control the entities that can access our class members.
The concept of visibility is very important because we may have members of our class that should not be externally accessed or modified in order for it to keep working as intended. Thus, we can protect those members from being externally accessed and only expose the ones that make sense.
For example, if our class implements a very complex algorithm that needs a lot of internal configurations to work correctly, its wise that we don’t allow the modification of those data members, and thus they can be kept private. On the other hand, the members that are needed for passing the input values and getting the output values need to be accessible, and thus should be kept public.
In our case, to keep things simple for now, we will allow the access to our class members for both reading and writing. Thus, we use the public keyword followed by colon, before declaring the 2 previously mentioned integers.
Note that the keywords used for specifying the visibility are called access modifiers [2].
class TestClass{
public:
int x = 1;
int y = 2;
};
Now that we have declared and defined our class, we are going to move to the remaining code. We will test our class in the Arduino setup function. But first we will open a serial connection to later get the test results.
Serial.begin(115200);
Next we will instantiate our class, which corresponds to creating an object of that class. Since we declared no constructor, we can simply use the name of the class followed by our object name and the default constructor (takes no arguments and has empty body) is implicitly called [3].
TestClass myObject;
Since we assigned default values to our data members, we can check their value using our object. So, to access a data member, we simply use the dot operator on our object followed by the data member name.
Serial.println(myObject.x);
Serial.println(myObject.y);
We can also assign a different value to the class data member by accessing it with the dot operator and then performing the assignment with the equal operator, like we would do with a regular variable.
myObject.x=40;
Serial.println(myObject.x);
Note that although this works well, it’s also a valid approach to define data members than need to be exposed as private and then access / modify them with setters and getters.
Other important note is that the data members of our object are not shared with other objects we may create from the same class. So, if we created another object of the same class, both x and y would have the value 1 and 2, respectively, on that object.
The full source code for this tutorial can be seen below.
class TestClass{
public:
int x = 1;
int y = 2;
};
void setup() {
Serial.begin(115200);
TestClass myObject;
Serial.print("Data member x value after creating object:");
Serial.println(myObject.x);
Serial.print("Data member y value after creating object:");
Serial.println(myObject.y);
myObject.x=40;
Serial.print("Data member x value after assignment:");
Serial.println(myObject.x);
}
void loop() {}
Testing the code
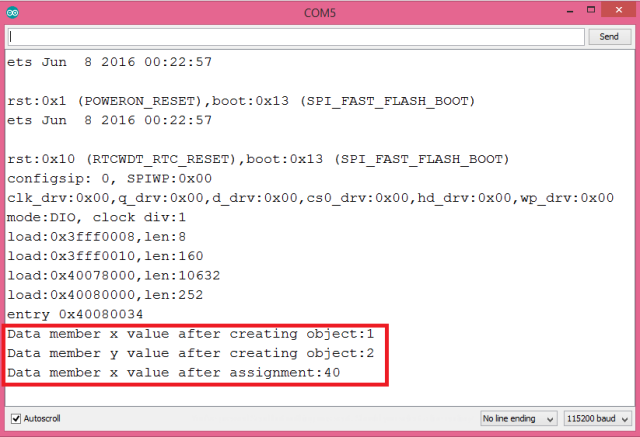
To test the code, simply upload it to your device using the Arduino IDE and then open the serial monitor. You should get an output similar to figure 1.

Figure 1 – Output of the program. Taken from the tests on the ESP32.
As expected, we first get the values we assigned when initializing the data members and then, after changing the value o x, we get that new value upon printing it.
DFRobot supply lots of esp32 arduino tutorials and esp32 projects for makers to learn.


