DFRobot US Warehouse is OPEN! 130+ Popular Items with Zero Import Fees. Learn More >>
Raspberry Pi 3: Getting the local IP address
Introduction
In this tutorial, we will check how to get the local IP address of the Raspberry Pi using the command line and the ifconfig command.
Knowing the IP address of the device is very important when we want to set up some kind of server (for example, a socket server or a HTTP server) and reach the Raspberry Pi from other devices on the same network.
Note that there are other ways of getting the local IP of the device, such as accessing this website, which takes advantage of the WebRTC API to get it. Nonetheless, we will cover how to do it from the command line.
As mentioned, we will use the ifconfig command. The name of the command stands for interface configuration and it allows to view and change the configuration of the network interfaces in our system [1].
We are going to get a local IP address, which is the private address assigned to the Raspberry Pi on the network to which it is connected. So, we cannot use that IP to connect to the Raspberry Pi from outside that network and only devices on the same network can reach it using that local IP.
In order to reach the Raspberry Pi from outside the network, we would need to use the public address of the router and perform a procedure such as port forwarding, which depends on the model of router you are using. We are not going to cover it on this post and if you try to do it, please take in consideration that there are some security dangers to be taken in consideration.
This tutorial was tested on a Raspberry Pi 3 model B+, running version 4.9 of Raspbian, installed using NOOBS.
The procedure
The first thing we need to do is opening a command line in the Raspberry Pi. Then, simply type the following command and hit enter:
ifconfig
Figure 1 illustrates the command line before we send the command.

Figure 1 – Sending the ifconfig command.
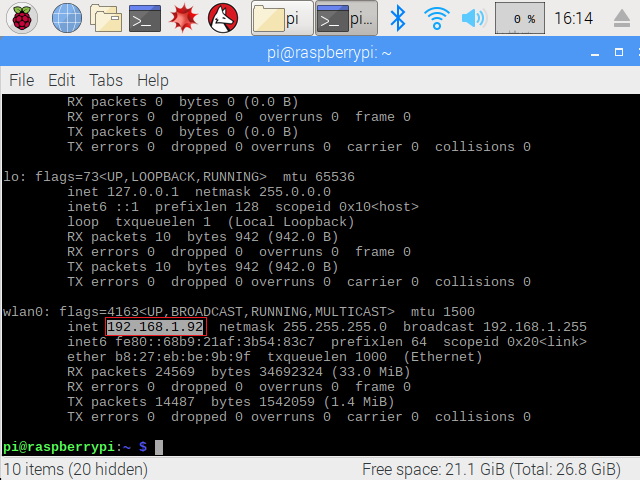
As soon you send the command, you should get an output like figure 2. Basically, when we use the ifconfig command without arguments, then it will output the information about all the active network interfaces of the device [1].

Figure 2 – Output of the ifconfig command.
Figure 2 is showing in more detail the wlan0 interface, which is the name of the wireless network interface of the system, since I’m connected to the local network using WiFi.
Note that if there were more wireless network interfaces, then they would be listed as other wlanx interfaces, where x would be the index of each interface [1]. For example, if we add an additional wireless interface, it would be listed as wlan1.
When we run the ifconfig command, an eth0 interface should also be listed and it corresponds to the Ethernet interface of the Raspberry Pi. Note that if your Raspberry Pi is connected to the network using an Ethernet cable, then you should get your local IP from that entry.
Again, if there were more Ethernet interfaces on the device, they would be listed as eth3, eth2, etc.. [1].
Note that there is also a lo entry, which corresponds to the loopback interface and allows the system to communicate with itself [1]. This is particularly useful for testing and we have already used this interface to test a Flask HTTP server on this previous post.
As highlighted in figure 2, we can get the local IP address of the device on the inet entry of the networking interface we are using. As mentioned before, I’m using WiFi to connect to the network, which is why I’m looking into the wlan0 interface.
If you are using an Ethernet connection, then you should look for the inet entry on the eth0 interface.
The IP address that you get should be the one assigned to your machine on the network to which you are connected, so it will most likely different from the one of my Raspberry Pi, which was shown in figure 2.
Testing the IP
Now that we have the IP address of the Raspberry Pi, we can do a quick test to see if we can contact it from another device.
To do it, we will simply send a ping to the Raspberry Pi from other computer. If everything is ok, then we should get an answer back to our ping.
To do it, open a command line on a computer connected to the same network as the Raspberry Pi and send the following command, changing #yourRaspberryIp# by the IP obtained in the previous section:
ping #yourRaspberryIp#
You should get an answer to all the packets sent. Figure 3 shows the output I’ve obtained from pinging my Raspberry Pi from a Windows 8 machine.

Figure 3 – Pinging the Raspberry Pi 3 from a Windows machine.


